Introduction

In this hands-on lab, you’ll extend the work you began in the 201 - Getting Started with API Builder lab, where you created and published APIs for ACME Chocolatiers — a fictional company that makes gourmet chocolates and partners with global retailers. Having built APIs to expose product, supplier, and inventory data, ACME now needs to operationalize and govern those APIs in a production environment.
Through a series of guided modules, you’ll learn how to:
-
Secure your APIs using authentication plans and policies that control access, enforce compliance, and protect backend data.
-
Socialize your APIs by publishing them to a branded developer portal, allowing internal teams and partners to discover, subscribe, and test them.
-
Monitor your APIs in real time with built-in analytics, health checks, notifications, and audit trails to ensure reliability, visibility, and continuous improvement.
Getting Help
Builder Labs are designed to be self-guided, but you don’t have to learn alone. If you ever get stuck, there are few ways to get support and keep moving forward:
-
Ask in the Community
Use this community to post your questions, share what you’re working on, and learn from fellow builders. Chances are, someone else has faced the same challenge and can help you out. -
Join Office Hours
Celigo hosts regular Office Hours where you can bring your questions directly to our experts. Check the Upcoming Events for upcoming sessions and drop in whenever you need hands-on guidance.
All of these resources are linked right here in the Celigo Community - so if you need help, you’re already in the right place.
Technology Overview
Modern digital ecosystems thrive on APIs — they enable businesses to connect applications, partners, and customers in real time. However, building APIs is only the first step. To truly unlock their value, organizations must secure, socialize, and monitor them effectively. This is where Celigo API Management comes in.

Each module is designed as a self-contained learning unit, yet they build progressively on one another to simulate a complete API lifecycle. You’ll take on the role of an API administrator at ACME Chocolatiers, responsible for governing the company’s APIs as they transition from development to production.
By the end of this lab, you will be able to:
-
Deploy and expose APIs through the APIM gateway.
-
Apply authentication and policy controls to safeguard your APIs.
-
Customize and publish APIs in a developer portal for partner access.
-
Track API performance and usage through analytics and dashboards.
-
Implement operational monitoring via health checks, notifications, and audit trails.
This hands-on experience will equip you with practical knowledge of Celigo’s unified API lifecycle — from building to managing APIs — ensuring that your organization’s integrations are secure, discoverable, and performant.
Hands-on Lab Overview
ESTIMATED TIME : 3 hours (all modules)
These hands-on exercises are designed for intermediate-level builders and focus on real-world use cases that demonstrate key capabilities of Celigo API management.
- Pre-requisite: Set up the APIM account and environments
- Module 1: Push API to API management console
- Module 2: Create Plans to Define Access Controls
- Module 3: Apply Custom Policies
- Module 4: Customize Developer Portal & Publish API
- Module 5: Subscribe to API as Consumer & Test
- Module 6: View Analytics & API Logs
- Module 7: Configure Health Checks & Custom API Dashboard
- Module 8: Set Notifications & Audit Trails
These modules are progressive - each module will teach you a new pattern in designing robust, scalable APIs using Celigo. Although you can finish the entire lab in 3 hours at a stretch, you may complete them at your own pace.
Pre-requisite: Set up the APIM account and environments
What You’ll Learn
Before you start using API management, you’ll need access to API management. In this module, you'll set up the APIM account and environment(s) and perform the prerequisites which will help you progress the next set of modules.
You’ll learn how to
-
Verify and request API management access
-
Configure subdomain and service account email
-
Confirm access to APIM console, and portal.
-
Configure environment prefix for APIM
Scenario
ACME Chocolatiers has completed development of a set of APIs using Celigo API Builder to expose product and supplier data. The next step is to make these APIs secure and discoverable by pushing them to the API Management console. As the administrator, you’ll first need to ensure that you have access to Celigo API Management (APIM).
Step 1: Verify and Request access to API management
-
In Celigo integrator.io, click on the Profile icon on the top right corner, and select Subscription in the drop down menu that opens.
-
Check whether API management is included in the Features include section.
-
If not included, reach out to a Celigo representative to request for a 30 day trial of API management. You may reply to the topic below to request for access. After requesting, wait for some time (maximum of 1 working day) for the API management trial to be provisioned.

Step 2: Configure your APIM Subdomain
-
As soon as you’re given access to API management, you should get an email with the subject - Complete your API Management setup.
-
Click on Set up APIM Subdomain link in the email, or click on the Profile icon in integrator.io on the top right corner, and select API settings in the drop down menu that opens.
-
In the API settings page, configure your Subdomain.
 NOTE
NOTE
This subdomain will be used for the APIM console, API Developer portal, and Gateway URLs. For example, since your organization's name is ACME Chocolatiers, you can use 'acme' as the subdomain. The subdomain has a 200-character limit (alphanumeric only). Be sure to choose your subdomain name carefully, as it cannot be edited from the UI once it is set. -
Also, configure the Service account email. This email address will own all APIs created in your organization and receive all email notifications.
-
Click on Save to save the changes.
-
Open the left navigation bar, and click on APIM console under Tools menu. A new tab should open and the APIM console should open.


Although you can view how the subdomain that you’ve entered creates the APIM console URL, you will not be able to login to the APIM console directly using that URL. You will need to access the console from the Tools menu in integrator.io. There are other ways you can access APIM console as well, which you will learn in upcoming modules.
Step 3: Configure Environment Prefixes for APIM
-
Select the Environments tab from My Account page, or select Environments from the Profile menu drop down.
-
Click on an environment (say Development) to open Edit environment pane.
-
Enter a value in Environment prefix for APIM field. For example, in case of Development environment, you can enter “dev”.
-
Configure the Environment prefix for APIM, for other environment as well, i.e. Production. Once the environment prefixes are configured, the API gateway URLs and the Developer portal URLs for all those environments will be updated.

SUCCESS
You finished this section - great job! You now have access to API management! Continue to the next module.
Module 1: Push API to API management console
What You’ll Learn
In the previous 201 - Getting Started with API Builder lab you had built a few APIs in integrator.io, using the low-code API builder tool. After an API is built, it needs to be pushed to the API management console, as part of the Build phase of API management, so that the API can then be secured, socialized and monitored.
In this module, you'll learn:
- Pushing a new API endpoint from integrator.io into the API Management console
- Difference between backend and managed endpoints
- Plans and Policies, and their default configurations in APIM console
- Pushing endpoint to an existing API in APIM
Scenario
ACME Chocolatiers has completed development of a set of APIs using Celigo API Builder to expose product and supplier data. The next step is to make these APIs secure and discoverable by pushing them to the API Management console. As the administrator, you’ll register and push your API to Celigo API Management (APIM), creating a managed gateway endpoint that sits between your consumers and backend systems. This ensures every call is authenticated, monitored, and governed.
TERM - API Management (APIM)
API Management acts as a proxy between API consumers (applications built by partners, customers or internal teams) and the backend services built or hosted within integrator.io, or even outside of Celigo platform. There 3 main components in API management:
The API Gateway serves as the entry point for all API traffic. It intercepts incoming requests from consumers, enforces authentication, applies policies, and routes the requests to the appropriate backend services on integrator.io.
The APIM Console is where API administrators configure and control API behavior — defining authentication plans, applying governance policies, publishing APIs, and monitoring analytics.
The Developer Portal provides a user-friendly interface for external or internal developers to discover available APIs, read documentation, subscribe to access plans, and test API endpoints directly.
Step 1: Push an API to APIM
-
In Celigo integrator.io, go to the Production environment, and open the Resources > APIs page, where you should find the ACME Item Info API.
-
Click on the ellipsis icon, and select Push to APIM.
-
In the Push to API management drawer, select/enter:
- Option: Create new API (default selection)
- API definition: V4 (default selection)
- Context path: item
- HTTP method: GET (default selection)
- Endpoint: info
-
Click on Push to APIM button, to push this API to the API management console and gateway.
-
You will be navigated to the API management console in a new browser tab.
-
Review the name, description and version, and select Start the API. Confirm by selecting Start in the pop up that opens.


Step 2: Navigate the APIM Console
-
Under APIs, select the menu item - Endpoints. Click on the pencil icon to view/edit the endpoint details.
-
In the General tab under Endpoints, note that the Target URL is the backend endpoint URL which you had configured in API builder.
-
Select the menu item - Entrypoints, to review the context path which you configured in the Push to API management drawer in an earlier step.
-
Select the menu item - Documentation, to review the OpenAPI specification which is automatically generated, based on how you have configured the API. Select the Documentation pages tab, and then select the row named “OpenAPISpec.yaml”.
 PRO TIP
Click on Collapse menu on the bottom-left corner to make more space on the right. Click on the icon again to expand the menu. In its collapsed state, to open a page e.g. APIs > Policies, hover over the APIs icon in the main menu, and then select Policies. -
On the left, you will find the OpenAPI specification in yaml format. On the right, expand the default accordion to view the endpoint in Swagger format.
-
Review the managed endpoint URL (or the gateway URL) which is displayed under Servers. This includes the context path “/item”.
-
The endpoint path (“GET /info”) that you had entered in the Push to API management drawer is not shown here, but is available under Policies. Navigate to APIs > Policies page.
TERM - Policies
Policies are customizable rules or logic that the APIM gateway executes during an API transaction. These rules can secure APIs, transform data, restrict access, and monitor traffic. There are 50+ policies to choose from, can be applied either at the Request phase or the Response phase of an API transaction. -
Under Common flows, you will see the endpoint “/info”. Select the endpoint (flow) to see a Dynamic routing policy which is auto-applied for seamless integration between API management and integrator.io.
NOTE
In the context of API management, an endpoint is also called a flow, especially in the Policies page in APIM console. This is different from a flow in integrator.io. -
Navigate to APIs > Consumers page, to view the auto-configured API key plan. This ensures your API is secured as soon as it is created in API management.
TERM - Plans
Plans are access control layers that define how your API consumers can subscribe to and use your API. By creating different plans, you can enforce security and governance measures based on the type of user, protecting sensitive data and enforcing traffic shaping. There are various plan types such as API key, JWT, OAuth2, mTLS and Keyless. At least one plan is required before an API can be deployed on the API gateway.


Step 3: Push to an Existing API in APIM
-
Go to integrator.io > Resources > APIs, to push another endpoint (ACME Fetch Items and Send Notifications API) to this API in API management. Multiple endpoints are grouped in a single API so that it can be managed together and also create a single OpenAPI spec.
-
Click on the ellipsis icon for that API, and select Push to APIM.
-
In the Push to API management drawer, select/enter:
- Option: Add to existing API
- Select existing API: ACME Item Info API
- HTTP method: POST
- Endpoint: notification
-
Click on Push to APIM button, to push this API to the API management console and gateway.
-
You will be navigated to the API management console in a new browser tab. Click on Deploy API at the top of the screen to deploy the changes to the APIM gateway. Confirm changes by clicking Deploy again in the pop up that opens.
-
Navigate to APIs > Policies page. You will see the new flow/endpoint called “POST /notification“ being added.


Step 4: Push to APIM as a V2 API Definition
-
In Celigo integrator.io, navigate to the Development environment from the selector on the top right corner. Go to Resources > APIs page
-
Click on the ellipsis icon for ACME Item Info API. Choose Push to APIM.
-
In the Push to API management drawer, select/enter:
-
Option: Create new API (default selection)
-
API definition: V2
-
Context path: item
-
HTTP method: GET (default selection)
-
Endpoint: info
TERM - API Definition
An API definition is a JSON representation of all the information the API management console and gateway need to know to proxy requests, apply policies, and create plans for your APIs and their transactions. There are 2 API definition versions in APIM - v2 and v4. The default API definition version is v4, but you can choose v2. Note that the API version is not the same as the API definition version. -
-
Click on Push to APIM button, to push this API to the API management console and gateway.
-
You will be navigated to the API management console in a new browser tab.
-
Review the name, description and version, and select Start the API. Confirm by selecting Start in the pop up that opens.


Step 5: Create a New v2 API manually in APIM
-
Even though you can push an API from integrator.io to API Management which automatically configures the API with plans, policies, documentation, etc., you can also create an API directly in APIM console, and then manually configure the API. Go to the APIs page.
-
Click on + Add API button.
-
You will find two options to create a new API. First, let’s select Create API v2 option.
-
Enter the general details of the API, and click NEXT.
- Name: ACME Order Processing API
- Description: An API to process orders in Shopify and return the order Id
- Version: 1.0
- Context path: /order
-
Enter a dummy backend service, say https://api.integrator.io/apis/v1/dummy, and click NEXT.
PRO TIP
You may enter a backend service that is outside of Celigo integrator.io. -
In the Plan configuration page, enter the following details, and then click NEXT.
- Name: Keyless plan
- Description: For testing purposes only
- Security type: Keyless (public)
-
Click on SKIP, and then on CREATE AND START THE API.


Step 6: Create a New v4 API manually in APIM
-
Go to the APIs page again, and click on + Add API.
-
This time, click on Create to create a v4 API.
-
Enter the following details, and then click on Validate my API details.
- API name: ACME Customer Info API
- Description: API to fetch customer information from various backend systems
- Version number: 1.0
-
Select HTTP Proxy, and click on Select my entrypoints.
-
Enter /customer as the Context-path. Click on Validate my entrypoints.
-
Enter https://api.integrator.io/apis/v1/dummy as Target URL. Scroll down and click on Validate my endpoints.
-
Under Security, with the Keyless plan selected, click on Validate my plans.
-
Click on Save & Deploy API.


You finished this section - great job! You have successfully pushed endpoints from integrator.io to API management, as well as created new APIs directly in the APIM console. You have also navigated the console while learning new concepts like plans and policies. Continue to the next module.
Module 2: Create Plans to Define Access Controls
What You’ll Learn
The Secure phase of API lifecycle management starts here. This phases focuses on protecting APIs through authentication, authorization, encryption, and access controls. It ensures that only the right users and systems can interact with an API - safeguarding data, maintaining compliance, and reducing the risk of misuse or breach. In this module, you’ll learn:
- Reviewing the default plan - API key
- Creating a new JWT authentication plan
- Creating a new Basic authentication plan
- Adding traffic shaping policies such as rate limits, quotas per plan
Scenario
ACME serves different types of consumers - internal applications, logistics partners, and retail distributors - each requiring unique access privileges. You’ll design plans that define how each group authenticates and interacts with ACME’s APIs. For example, internal teams may use Basic Auth while partners authenticate using JWT tokens. By creating multiple plans, you’ll ensure controlled access aligned with business needs and compliance policies.
Step 1: Review and Test API using the default API Key Plan
-
In Celigo integrator.io, navigate to the Production environment from the selector on the top right corner. Go to Resources > APIs page.
-
Click on the ellipsis icon for ACME Item Info API. Choose View in APIM. You will be navigated to the APIM console > APIs > Configuration page.
-
Go to APIs > Consumers page. Click on the pencil icon on the API key plan to view/edit the plan.
-
Enable Auto validate subscription. Later, when you publish the API for external consumption, you can disable this option. Save the changes. Review the rest of the authentication configuration.
-
Select Applications in the main menu, and then click on + Add Application.
-
Enter the application details:
-
Name: ChocoMart
-
Description: Dummy app for a partner of ACME Chocolatiers
-
Client ID: 63845123 (Any value can be entered. This field is optional, and is only used in JWT and OAuth 2.0 plan types)
-
-
Save the changes.
-
Navigate to APIs > ACME Item Info API > Consumers page. Select Subscriptions tab. Click on + Create a subscription.
-
In “Search an application by name”, enter the application name to select from a drop down list. Select the API key plan. Click on Create to confirm.
-
In the Subscriptions tab, scroll down to the API Keys section. Since the subscription request got auto-validated, an API key is generated without any approval. Click on the copy icon to copy the API key.
-
Navigate to APIs > Documentation > Documentation Pages > OpenAPI spec.yaml. Click on Authorize.
-
Paste the API key value in the dialog that opens. Click on Authorize to confirm, and then close the dialog.
-
Expand the default accordion to view the endpoints: GET /info and POST /notification. Expand the GET /info section and select Try it out.
-
Enter ACME001 from your Airtable > Products table in the sku query parameter field.
-
Click on Execute to test the API. A success code of 200 should be returned, along with a Response body, as shown below. This is the same experience your API consumer would have while testing the API published in the developer portal.
NOTE
If you get an error response code of 500, it could be due to the API level gateway timeout. You can try it again, or increase the API level timeout. Navigate to APIs > Endpoints, select Edit, select Configuration tab, and update the Read timeout from 10000 ms (or 10 seconds) to a higher number (say 15000 ms).There is also an environment level timeout, which supersedes any API level timeout in that environment and can be accessed from Settings > Analytics page. Scroll down the Analytics page to find the field HTTP client timeout. You can update it to a maximum of 45 seconds, which is set at the organization level.


Step 2: Invoke the API externally using API Key
-
Go to Postman which you had set up in the previous lab. Go to your workspace.
-
Click on New, and then select HTTP.
-
Enter the following details:
-
HTTP method: GET
-
URL: https://production-acme.gateway.apim.integrator.io/item/info
-
Query parameter: sku = ACME001
-
-
Under Authorization, select Auth type as API key.
-
In the APIM console, go to APIs > Plans > Subscriptions, and click on the pencil icon, as shown below. Scroll down and copy the API key.
-
In Postman, enter the key as “x-celigo-api-key”, and paste the API key value.
-
Hit Send to send a test API request to that API endpoint using API key authentication. The API should be successfully authenticated and you should see a 200 success response with a body showing the item information fetched from your Airtable > Products and Suppliers tables, via the backend service (ACME Item Info API) in integrator.io.


Step 3: Create a new JWT Plan
-
Now we’ll create a JWT plan. Let’s add it for the other API that we pushed to APIM from the Development environment, with API definition as V2. In the APIM console, click on the environment select and choose Development. You will need to expand the left navigation bar to view the environment selector.
-
Go to APIs > ACME Item Info API > Plans page. Click on + Add new plan. Select JWT from the drop down list.
-
Enter the plan name - JWT plan. Enable Auto validate subscription. Click on Next.
-
Select a Signature, e.g. HMAC_HS256, from the drop down. Enter a Resolver parameter.
PRO TIP
The Resolver parameter is the JWT secret that can be generated using from this site - https://asecuritysite.com/encryption/plain. Change the Key size to 256-bit and select Determine. Copy the key value. -
Scroll down and select the Extract JWT Claims toggle to ON. Click on Next.
-
Add a Rate limiting policy (of 5 requests per second, for testing purposes) for the JWT plan. Enter value for Max requests (static) as 5. Select Time units as MINUTES from the drop down. This is an optional step while creating the plan, as the policy can also be applied later in the Policy Studio page. Scroll down and click on Create.
-
Once the plan is created, it will display in the STAGING tab. Click on the Publish icon, as shown below, to publish the plan. Select Publish in the confirmation pop up that opens.
-
Click on Deploy API to deploy the API, similar to how you’ve deployed the API earlier. Go to the PUBLISHED tab to view the default API key plan, as well as the newly created JWT plan.
-
Before you subscribe to this plan you will need an application in this Development environment. You can create that similar to how you did in one of previous steps for the Production environment. Select Applications in the main menu, and then click on + Add Application.
-
Enter the application details:
-
Name: ChocoMart
-
Description: Dummy app for a partner of ACME Chocolatiers
-
Client ID: 63845123 (Any value can be entered, which you will need to use to generate the JWT token)
-
-
Go to Applications > Subscriptions page. Click on + Create a subscription.
-
Search an API by name - ACME Item Info API. Choose the JWT plan, and click on Create to create the subscription, which automatically will get validated.
-
Generate a new JWT token.
TERM - JSON Web Token (JWT)
The JSON web token (JWT) offers stronger authentication and security over API key as it contains digitally signed claims (e.g., issuer, subject, expiry) and can be verified cryptographically, ensuring authenticity and integrity. It also offers better Integration with Identity Providers (IdPs) as it fits naturally into OAuth 2.0/OpenID Connect authentication mechanisms and can be issued by trusted IdPs like Auth0, Azure AD, or Okta. PRO TIP
To generate a new JWT token, go to https://www.jwt.io/. Select JWT Encoder.-
Go to https://www.epochconverter.com/, enter a future date and select Human date to timestamp. Copy the epoch timestamp, and paste it as a value in the JWT > payload > iat field, as shown below.
-
Add a new field - “client_id”. Copy the Client id from the application that you created earlier and paste it as the value.
-
Next, copy the Resolver parameter (JWT secret) that you created earlier, and paste it in the Secret section, to sign the JWT.
Click COPY to copy the JWT token, which will be used in the next step to invoke the API.
-


Step 4: Invoke the API externally using JWT
-
Go to Postman which you had set up in the previous lab. Go to your workspace.
-
Click on New, and then select HTTP.
-
Enter the following details:
-
HTTP method: GET
-
Query parameter: sku = ACME001
-
-
Under Authorization, select Auth type as Bearer token.
-
Paste the JWT token that you had copied in the previous step. Hit Send. The API call should get successfully authenticated with JWT, and you should see a 200 success response with a body showing the item information fetched from your Airtable > Products and Suppliers tables, via the backend service (ACME Item Info API) in integrator.io.


You finished this section - great job! You have successfully added plans in API management, and invoked the API using API key and JWT. Continue to the next module to learn how to add custom policies.
Module 3: Apply Custom Policies
What You’ll Learn
We’re still in the Secure phase of API management. After configuring the API plans in the previous module, you’ll want to apply and enforce custom policies based on your security and compliance needs. In this module, you’ll learn:
- Adding policies related to security and governance
- Adding transformation policies
- Adding performance and other policies
- How to configure the CORS
Scenario
To protect API performance and enforce compliance, ACME must govern how consumers use its APIs. In this module, you’ll apply policies - such as cache, quota, IP filtering, data logging masking, and payload transformations - to control usage and maintain consistency. For example, you might restrict API calls to trusted IP ranges or mask sensitive supplier data before sending it to partners.
Step 1: Add a Cache Policy to Improve Performance
-
In the Development environment of APIM console, go to APIs > ACME Item Info API > Policy Studio.
-
Click on the ALL /** flow under API Key Plan.
-
Search for Cache policy in the search bar. Click on the policy to view the documentation on the policy. As mentioned in the documentation, you will need to add a Resource first.
-
Go to APIs > Resources page. Click on + Add Resource button to add a new resource.
-
Choose Cache as the resource type and click on Select.
-
Configure the Cache resource:
- Name: Item information
- Time to idle (sec): 10
- Time to live (sec): 10
- Max entries on heap: 1000
-
Click on Save. Click on the toggle to Enable the resource, and then Deploy the changes to the gateway.
-
Go to APIs > Policy Studio. Click on the ALL /** flow under API Key Plan.
-
Search for the Cache policy and then drag the policy and drop it onto the Request phase.
-
Click on the Cache name field, to select the resource which you just added.
-
Click on the OK icon and then on Save button to save the changes. Click on Deploy API to deploy the changes to gateway.
-
Since you have added the Cache policy for the API key plan, you can invoke the endpoint using API key a few times and observe the reduced response times. First, subscribe to the API key plan following the same steps as in the previous module. Copy the API key that you will need to authenticate the API.
-
Invoke the API from Postman using the API key.
-
HTTP method: GET
-
Query parameter: sku = ACME001
-
Authentication:
- Key: x-celigo-api-key
- Value: Paste your API key here
-
-
Notice the response time - it should be a few seconds. Invoke the API few more times and notice the change in response time. It should be in few hundred milliseconds - a much improved performance, due to the Cache policy.


Step 2: Add a Quota Policy for managing API traffic
-
Go to APIs > Policy Studio, and click on the ALL /** flow under API Key Plan.
-
Search for the Quota policy and add it to the Request phase. Save the changes.
-
Configure the Quota policy to 10 requests/hour.
-
Max requests (Static): 10
-
Time duration: 1
-
Time unit: HOURS
-
-
Click on the OK (tick) button, Save the changes and then Deploy API.
-
Go to Postman, and invoke the endpoint more than the max number of requests, within the time frame, e.g. 10 times within an hour. You should get an error response of 429 - Too many requests, with message - "Quota exceeded! You reached the limit of 10 requests per 1 hour".
-
In APIM console > Policy Studio, hover over the Quota policy, and click on the Enabled switch to toggle it off, so that you do not get the 429 error when making further requests in the next steps. Save the changes and then Deploy API.


Step 3: Add a JSON to XML Policy in the Response Phase
-
Let’s say, you want to return a response in an XML format instead of JSON. You can do that by adding the JSON to XML policy in the response phase. Go to APIs > Policy Studio, and click on the ALL /** flow under API Key Plan.
-
Search for the JSON to XML policy and add it to the Response phase. Save the changes, and Deploy API.
-
Go to Postman, and invoke the endpoint using the API key. You should see the response in XML format, as shown below.


Step 4: Add a Role Based Access Control Policy
-
Let’s say you want to authorize and enforce Role based access control for your consumers, such that only calls, with specific roles such as “admin”, sent in the JWT token payload, can invoke the API. Go to APIs > Policy Studio, and click on the ALL /** flow under JWT Plan.
-
Add 2 new policies (Assign Attributes & Role Based Access Control) in the Request phase, as shown below.
-
Assign attributes: In this step, the JWT claims will be extracted and the relevant field will be pushed in into an attribute. After adding the policy and saving it, select + NEW ATTRIBUTE, and then add the below details. Save the changes.
-
Name: gravitee.attribute.user.roles
-
Value: {#context.attributes['jwt.claims']['roles']}. This is in Expression language format.
-
-
Role Based Access Control (RBAC): In this step, the field added to the above attribute will be used to authorize access to the backend service. After adding the policy and saving it, select + NEW ROLE, and then add the role: admin, as shown below. Save the changes, and Deploy API.
-
-
Go to jwt.io and add a new field in the payload: "roles": ["admin"]. Copy the JWT token.
-
Invoke the API from Postman using the new JWT. You should see a 200 OK success response.
-
In jwt.io, change the value of “roles” array to anything else other than “admin”, e.g. “write”. Copy the new JWT token.
-
Invoke the API again from Postman with the new JWT having the role as “write”. This time, you should see a 403 Forbidden error as shown below, with the message - “User is not allowed to access this route.”


Step 5: Review Dynamic Routing & Add new Policies in V4 APIs
-
Similar to how you have added policies in APIs with V2 API Definition, you can do the same in APIs with V4 API Definition. In the APIM console, select the environment to change it to Production. You will need to expand the left navigation bar to view the environment selector.
-
Go to APIs > ACME Item Info API > Policies page. Select the GET /info flow.
-
You should see a Dynamic Routing policy already applied. This policy is used to dispatch inbound calls to different backend service endpoints, for example, calls to GET /info will get proxied to https://api.integrator.io/apis/v1/item/info, whereas calls to POST /notification will get proxied to https://api.integrator.io/apis/v1/item in integrator.io. Click on the ellipsis icon on the policy and select Edit, to view the routing configuration. Do not change anything, and click on Cancel.
-
Now, let’s add an IP filtering policy to only allow requests originating from certain IPs, in order to enhance the security of your API. Click on the + icon to the right of HTTP Proxy in the Request phase. Search for the “IP filtering” policy, and click on Select.
-
In the IPs Whitelist section, click on + Add button, and then enter your IP. Also, select IPV4 in the Lookup IP version to use drop down field.
-
Click on Add policy button to add the policy to the request phase.
-
Save the changes and Deploy API.
-
Go to APIs > Consumers page, and select Subscriptions tab.
-
Select the pencil icon to open the Subscription. Scroll down and copy the API key.
-
Invoke the API from Postman using API key authentication.
-
HTTP method: GET
-
URL: https://production-acme.gateway.apim.integrator.io/item/info
-
Query parameter: sku = ACME001
-
Authentication:
- Key: x-celigo-api-key
- Value: Paste your API key here
-
-
You should see a success response, since your IP is whitelisted.
PRO TIP
If you get a 403 Forbidden error, it means the IP that you have whitelisted is incorrect. You can refer the error message in Postman, and use that IP in your policy configuration. Also, instead of using a single IP, you may used Classless Inter-Domain Routing (CIDR) notation to whitelist a range of IP addresses. -
Go to APIs > ACME Item Info API > Policies page. Select the GET /info flow.
-
Edit the IP filtering policy again. This time, add your IP to IPs Blacklist section. Remove the IP from IPs Whitelist section by selecting the cross icon. Save the changes and Deploy API.
-
Invoke the API from Postman using API key authentication. This time you should see a 403 Forbidden error response, with a message: “Your IP (**.**.**.**) or some proxies whereby your request pass through are not allowed to reach this resource.”, as shown below.
-
Finally, let’s disable this policy. Click on the ellipsis icon for IP filtering policy, and select Disable.


Step 6: Add Policy to Conceal Sensitive Data
-
In order to conceal sensitive data in the API response, you will need to use the JSON to JSON Transformation policy in the Response phase. In the APIs > Policies page, select GET /info flow. Click on the + icon in the Response phase section.
-
Search for the JSON to JSON Transformation policy and select it.
-
Let’s say you want to mask the supplier phone number. In the JOLT field, enter the following JOLT specification.
[ { "operation": "modify-overwrite-beta", "spec": { "supplier": { "phone": "************" } } } ] -
Save the changes, and Deploy API.
-
Invoke the API from Postman using API key. You should see the phone number masked in the response, as shown below.


You finished this section - great job! You have successfully added custom policies in API management, and invoked the API to see the policies being enforced. Continue to the next module to learn how to customize your developer portal.
Module 4: Customize Developer Portal & Publish API
What You’ll Learn
Now we’re in the Socialize phase of API management which focuses on making APIs discoverable, accessible, and easy to adopt. This includes publishing APIs through developer portals, providing clear documentation, enabling onboarding workflows, and supporting subscription and access management. In this module, you’ll learn:
- The purpose of the developer portal, and how to access
- How to Customize branding of portal, layout, and categories
- How to Publish APIs with Technical (OpenAPI spec) and User documentation to portal
Scenario
With the API now secured and governed, ACME wants to make it easy for partners to find and integrate with its services. You’ll brand and customize the Developer Portal to match ACME’s identity and publish your managed API so external partners can explore it, view documentation, and subscribe for access.
Step 1: Publish API to Developer Portal
-
In the APIM Console, go to APIs > Configurations page for ACME Item Info API in Production environment.
-
Click on the API picture, to add an image. Download the image from here, or use one of your choice. Upload the image.
-
Click on Publish the API and then on Publish button again in the confirmation dialog, to publish the API to the Developer portal.
TERM - Developer Portal
A Developer Portal is a self-service, customizable website that serves as a central hub for API consumers to discover, learn about, and use an organization's APIs. It provides API documentation, sample code, and interactive tools for trying out APIs, and allows developers to request access and manage their subscriptions. -
Click on the Developer Portal link on the top left corner of the screen, to open the portal. Note: This is how the API publisher can access the portal from the APIM console. But API consumers will need to sign up to the portal first, and then can log in, which we will learn in the next module.
-
Click on Catalog to view the API that you have published. You will see the portal in default theme. Next, we’ll see how to customize the portal theme.


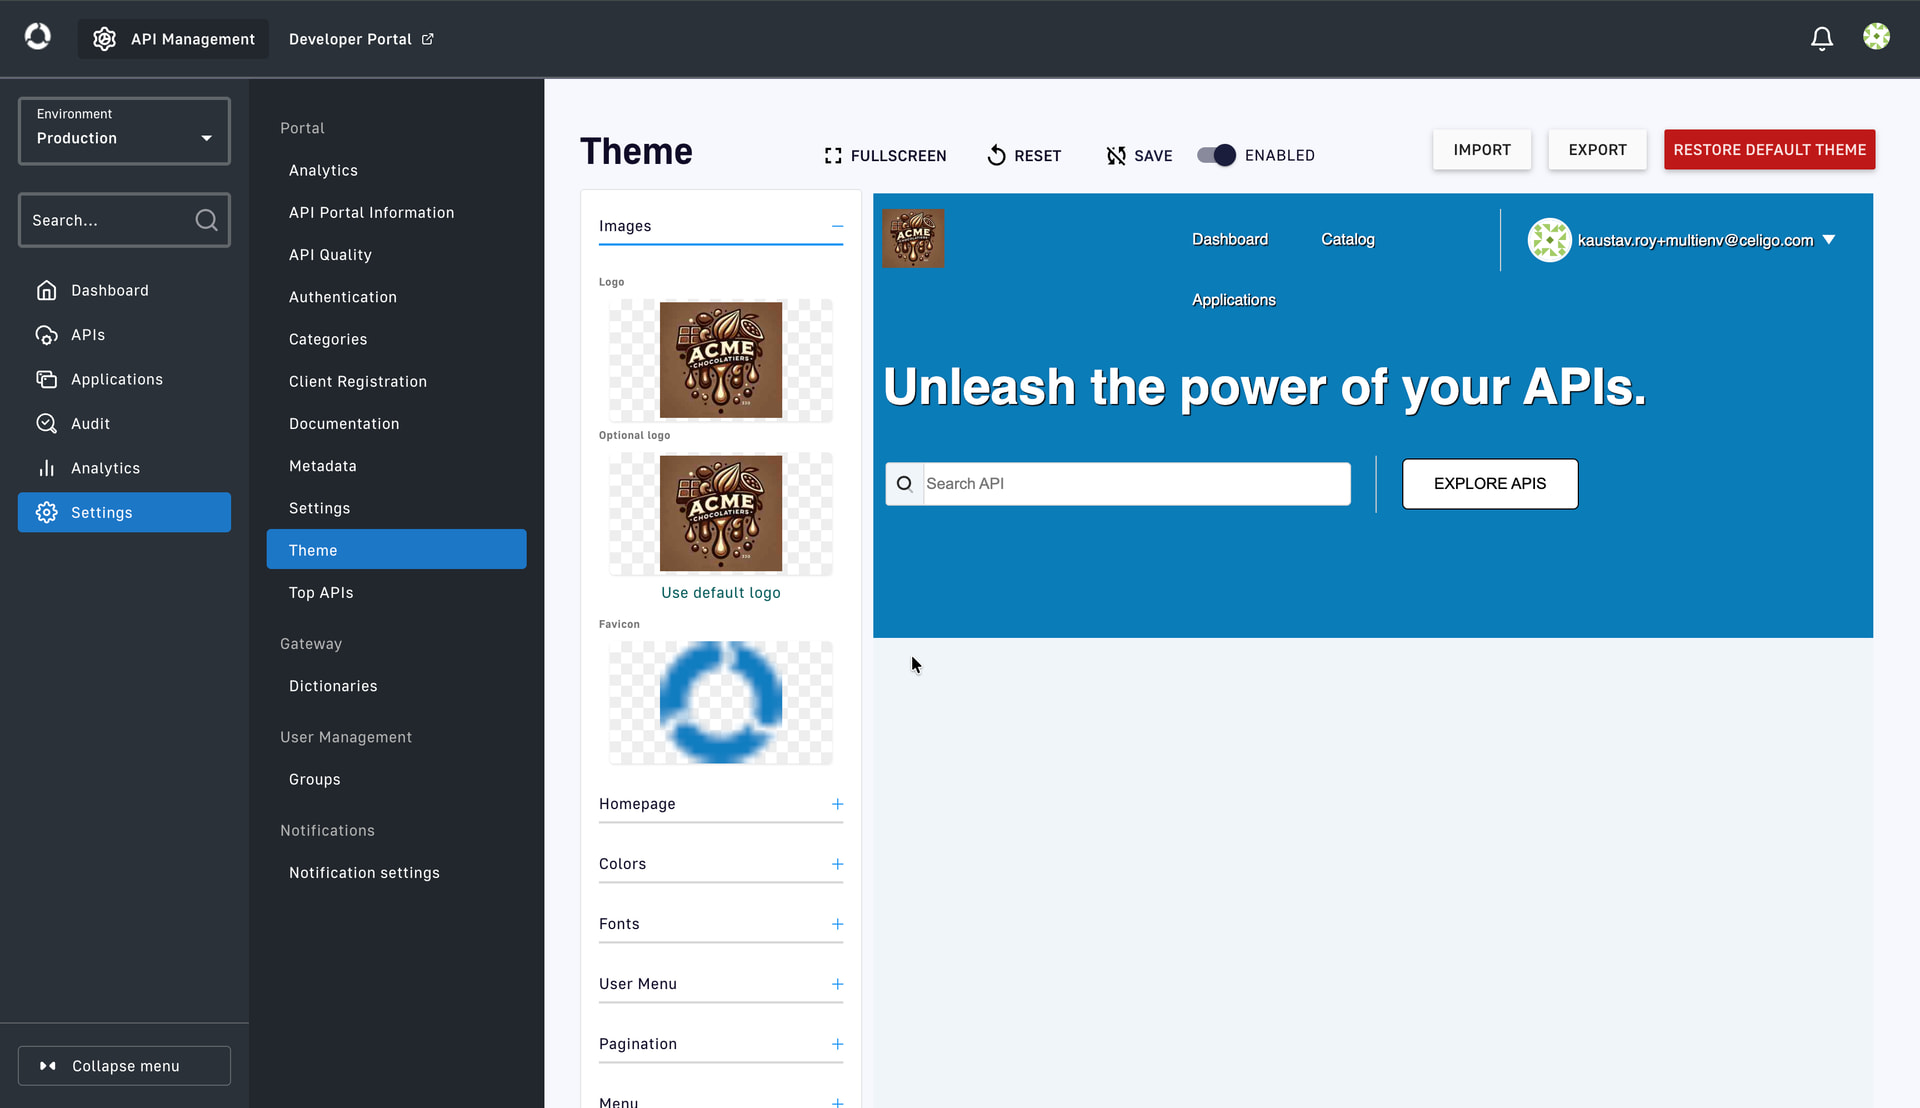
Step 2: Customize Branding of Developer Portal
-
In the APIM console, go to Settings > Theme page. Here you will find all the options you need to customize the ACME Chocolatiers branding of your portal.
-
Click on the ENABLED switch.
-
Hover over the block for Logo (first one under Images accordion), and select Change. Upload the ACME Chocolatiers logo, which you can download from here. Similarly, upload the ACME Chocolatiers logo again for the Optional logo.
-
Expand the Homepage accordion. Hover over the Homepage background image block and click on Change. Upload the ACME Chocolatiers homepage banner, which you can download from here.
-
Expand the Menu accordion. Select the blue dot to change the color to something chocolatey.
-
Select RGB and change the color scheme to rgb(150, 125, 110). Click on SELECT.
-
Expand the Header accordion. Select RGB and change the color scheme to rgb(130, 93, 71). Click on SELECT.
-
Click on EXPORT to export the theme, which can be imported into other environments. Also, click on SAVE to save the changes.
-
Click on the Developer Portal link on the top left corner of the screen, to open the portal again. This time you will see the updated theme which you have configured.


Step 3: View API Catalog with Categories in the Developer Portal
-
In the APIM console (Development environment), go to Settings > Categories page. Click on + Add Category button.
-
Enter “Internal” as the name of the category and select Create. This category will be used to catalog all your internal facing APIs.
-
Click on + Add API to Category button. Search for the ACME Customer Info API and click on Add.
-
Go back to Categories page, and create another category - “External”, to categorize all your external facing APIs. Add the ACME Item Info API and ACME Order Processing API to this category.
-
Go to APIs page and select ACME Customer Info API.
-
In the Configurations page > General tab, you will find the category already selected. Click on Publish the API, and then on Publish to confirm.
-
Similarly, go to the remaining APIs, review the category, upload an API picture if required, and Publish them to the Developer Portal.
-
Go to Settings > Theme page. Click on IMPORT, to import the theme that you created earlier. Select the file that you had exported earlier, or use this file to import the theme. SAVE the changes.
-
Click on the Developer Portal link at the top of the APIM console. You will see the updated theme of the portal.
-
Click on Catalog option at the top of the page. You will see 2 categories - Internal and External. Select External category.
-
Click on VIEW API for the ACME Item Info API.
-
Select the Documentation tab, and expand the default section, to view the API in Swagger format.


Step 4: Review and Update Technical Documentation (OAS)
-
In the API console, go to APIs > ACME Item Info API > Documentation page.
-
Select OpenAPISpec.yaml to open the technical documentation. This is an OpenAPI specification (OAS) document, which was generated in integrator.io based on how you had configured the backend API, and then added to the APIM console.
TERM - OpenAPI specification (OAS)
The OpenAPI specification is a widely accepted standard for defining RESTful APIs. It has multiple sections including the following ones:- info: High-level metadata about the API such as title, description, and version.
- servers: Lists the base URLs where the API is hosted; can include environment-specific endpoints.
- paths: Defines all available endpoints and their operations, including parameters, request bodies, and responses.
- components: Holds reusable items like schemas, parameters, responses, and security schemes referenced throughout the spec.
-
Review all the sections in the OAS and check if anything is missing. You will note that the new JWT plan which was manually added in APIM console is not there yet.
-
Add the below snippet under the components > securitySchemes section in the OAS.
jwtAuth: type: http scheme: bearer bearerFormat: jwt -
Scroll down and click on SAVE.
-
Click on the Developer Portal link at the top of the APIM console. Navigate to the ACME Item Info API > Documentation page.
-
Click on Authorize. You will find the newly added JWT authentication. Close the dialog.


Step 5: Create User Documentation and Publish to Portal
-
In the APIM console, in the APIs > ACME Item Info API > Documentation page, click on the + icon on the bottom-right corner of the page, and then choose the Markdown option.
-
Enter a page name, e.g. Homepage. Select the checkboxes for Set as homepage, and Publish this page. This will ensure that the new homepage page that you are creating, will be published to the portal.
-
Select the option - Import from file. Click on Choose file to import this markdown file.
-
Review the user documentation in the new page and click on SAVE.
-
In the Developer portal, for ACME Item Info API, select the General Information tab. You will see the new home page with the user documentation which you have created.


You finished this section - great job! You have successfully published APIs along with the technical and user documentation to the Developer portal. Continue to the next module to learn how an API consumer can subscribe and test the API.
Module 5: Subscribe to API as Consumer & Test
What You’ll Learn
We’re still in the Socialize phase of API management. In this module, you’ll learn:
- How consumers register and subscribe to APIs
- What are applications and how to configure it in the portal
- Using an application to subscribe to an API plan, and managing the subscription
- How to find access keys and try out the API from within the portal
Scenario
External developers from ACME’s retail partners now want to subscribe to the newly published APIs. Acting as a consumer, you’ll sign up through the Developer Portal, request access to an API plan, obtain credentials or tokens, and test your API. This process simulates a true partner onboarding experience, ensuring self-service access and reducing dependency on manual provisioning.
Step 1: View Public APIs in Developer Portal
-
As an API consumer (let’s say, a developer at your partner company - ChocoMart), the user will need to sign up to the developer portal - https://dev-acme.portal.apim.integrator.io/, before being able to access the API catalog. Open the portal from an incognito browser. You will see a Sign in option on the top right corner.
-
Click on Catalog to view publicly accessible APIs, without signing in. You will see the ACME Item info API is accessible under External category. You will be able to view the user and technical documentation as well.
-
Go back to the original browser where you have the APIM console already open, and go to APIs page. Here, you will see, under the Visibility column, that only the ACME Item Info API is marked as Public.
-
To make an API private, you will need to select Make Private from the Info page as shown below. Keep the ACME Item Info API as public, since we will see in the next step how your API consumer will sign up to the portal and then subscribe to the API.


Step 2: Sign up to the Developer Portal
-
As an API consumer, refresh the portal in the incognito browser.
-
Click on the Sign in option on the top right corner. Select Sign up! to register using a business or personal email id.
-
In the Create an Account page, enter the First name, Last name and Email. Select SIGN UP.
-
You will receive an email with subject: User registration. Click on the link in the email to confirm the registration.
-
In the Confirm the registration dialog, you will be asked to enter the password, and then confirm by entering it again. Click on CONFIRM.
-
Go to the portal sign in page, and enter the login credentials. Click on SIGN IN.
-
You will be able to access the Portal, and see your name on the top right corner.


Step 3: Create an Application in the Portal
-
In the APIM console (original browser), go to APIs > ACME Item Info API > Plans page. Click on the pencil icon for API key plan.
-
Un-select the Auto validate subscription check box. Save the changes.
-
Next, in the Developer portal (incognito browser), click on Applications. Select + CREATE AN APP.
-
Enter the application details:
- Application name: ChocoMart mobile app
- Description: A mobile application managed by Chocomart - partner of ACME Chocolatiers
-
Optionally enter a domain, and upload an image. Click on NEXT >.
-
Enter a Client Id (e.g. 63845125), and click on NEXT >.
-
Select the ACME Item Info API from the drop down, select the API key plan, and click on SUBSCRIBE. Enter some text (e.g. Please approve) in the Comment field, and click NEXT >.
-
Click on CREATE THE APP.
-
Go to Applications > ChocoMart > Subscriptions page in the portal. You will see the status as Waiting, since the subscription request is yet to be approved by the API publisher/administrator.
-
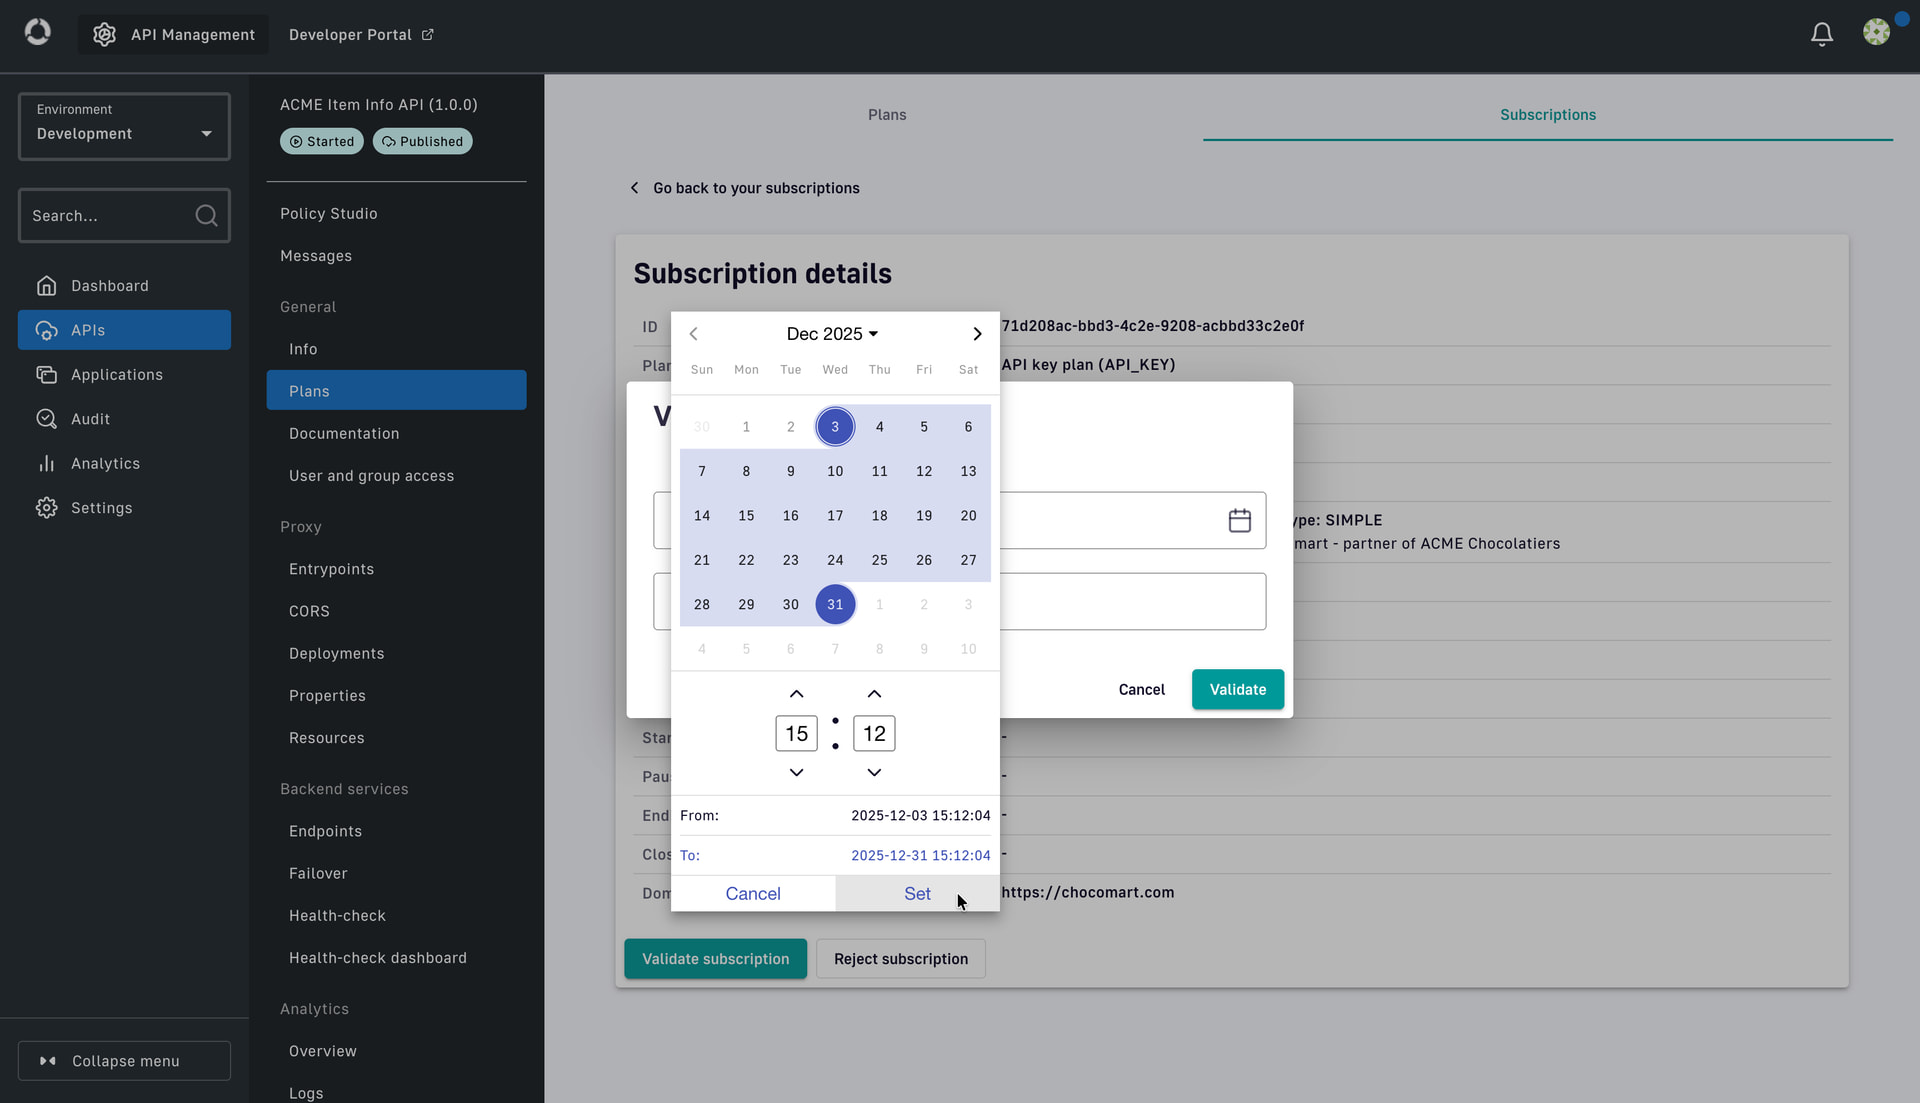
As an API publisher, go to the APIM console (in the original browser), and go to APIs > Plans > Subscriptions tab. Click on the pencil icon to edit the subscription.
-
Click on Validate subscription. Set a start and end date, and click on Validate to confirm.
-
Now, in the Developer portal (incognito browser), as an API consumer, refresh the Subscriptions page. You will see the Subscription status as Accepted, along with the start and end dates. You will also find the API key being generated. Copy the API key.


Step 4: Test the API in the Portal
-
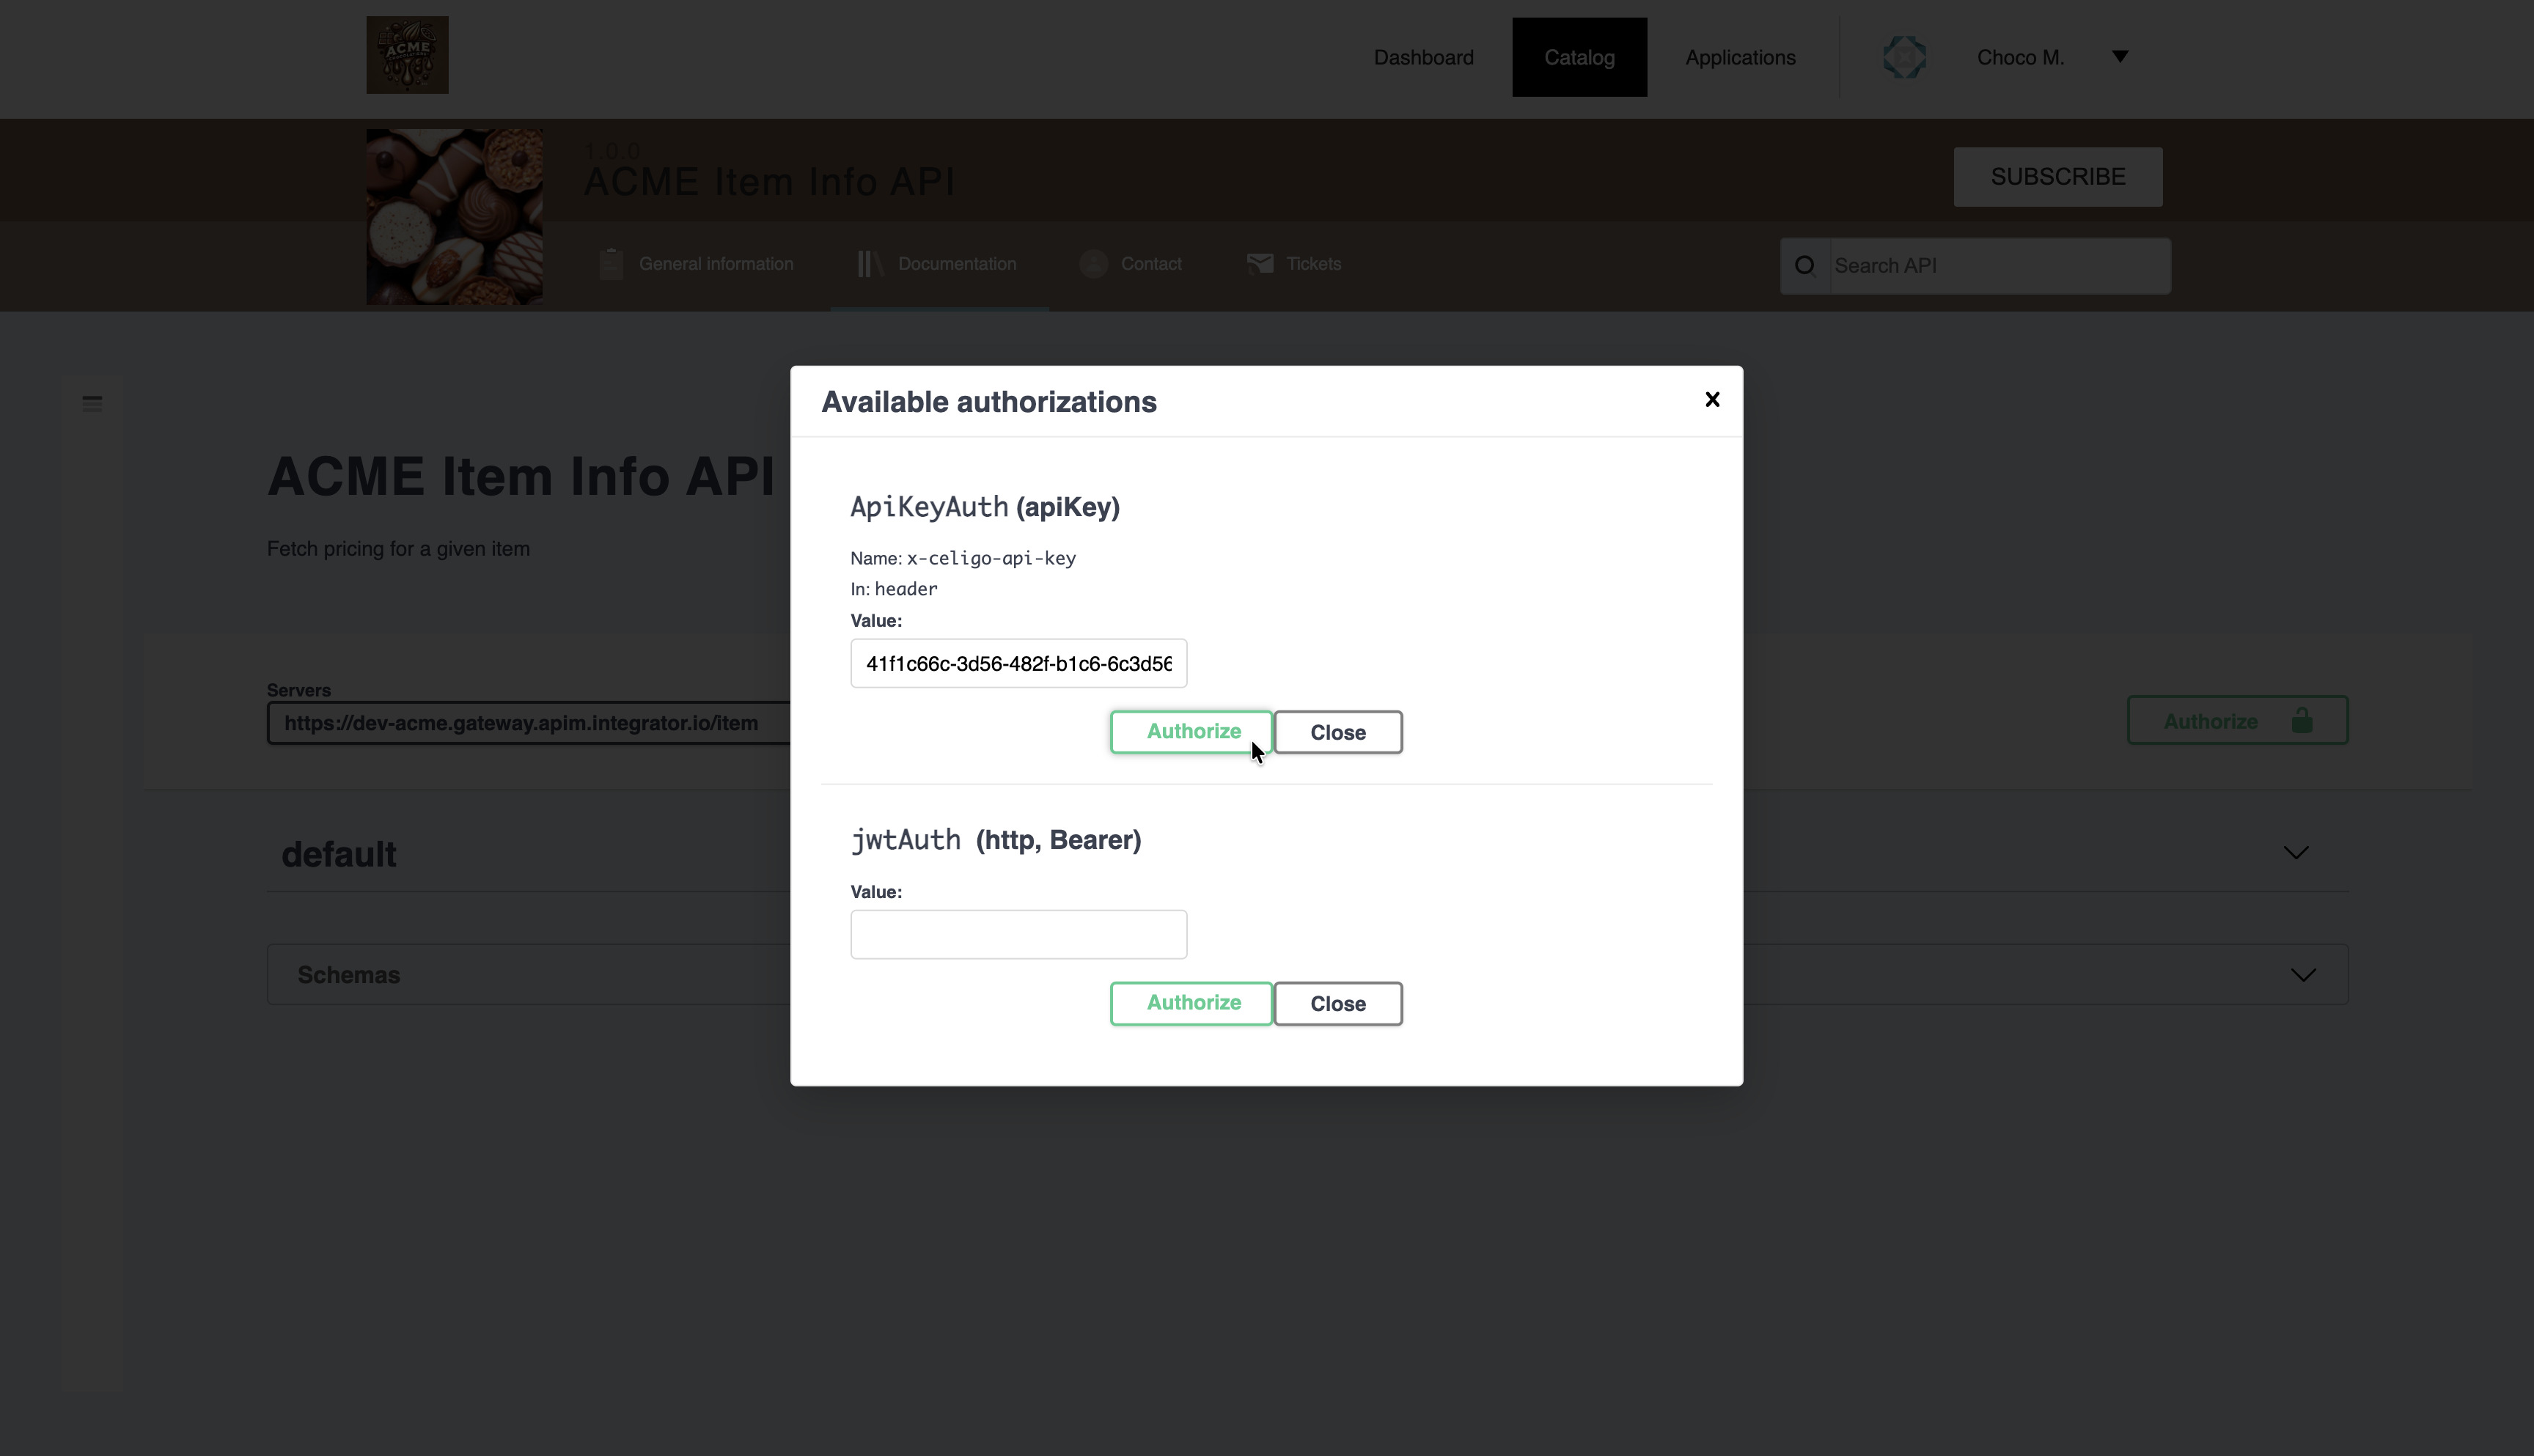
Navigate to the ACME Item Info API > Documentation page. Click on Authorize.
-
Paste the API key in the value field in the Developer portal. Select Authorize, and then Close the dialog.
-
Expand the default section, and the GET /info container. Select Try it out.
-
Enter the sku as ACME001. Click on Execute. You should get a success response, as shown below.


Step 5: Test the API with new API key and JWT from Postman
-
Go to Postman and invoke the API (GET https://dev-acme.gateway.apim.integrator.io/item/info?sku=ACME001) using the API key that was generated for the API consumer. You should get a success response.
-
Subscribe to the API again from the portal, following the same steps - this time using the JWT plan.
-
Since, Auto validate subscription is enabled for JWT plan, you will see this option - VALIDATE THE REQUEST. Click on it, to create the subscription and auto-validate.
-
Go to jwt.io, update the client_id based on what you had entered while creating the application. Enter the JWT secret (same as what was used to configure the JWT plan), and then copy the JWT.
-
Go to Postman, change the Authentication to Bearer. Enter the JWT and send the API request. You should see a success response. On sending more than 5 times in a minute, you will get a 429 error, due to the Rate limiting policy which you had added earlier.
-
Send a few more requests using the API key and JWT, along with some error scenarios - such as incorrect token, too many requests, etc. We will see these success and error responses in the next module, which talks about the Monitor phase of APIM.


You finished this section - great job! You have successfully impersonated an API consumer and seen how they can discover, subscribe and test the API in the developer portal. Continue to the next module to learn how you can view analytics and API logs.
Module 6: View Analytics & API Logs
What You’ll Learn
Next, we’re in the Monitor phase of API management. This phase focuses on tracking the performance and reliability of your APIs once your API consumers have started using them in their applications. Proactive monitoring helps maintain API stability, detect anomalies, and gain insights into usage patterns, ultimately enhancing the user experience and ensuring smooth API operations. In this module, you’ll learn:
- Navigating the API Analytics dashboard
- Viewing metrics such as latency, error rate, and usage by consumer
- Accessing and interpreting API request logs
- Using insights to improve performance and plan capacity
Scenario
Once partners start consuming ACME’s APIs, it’s critical to understand how they’re performing. You’ll use the Analytics dashboard to monitor traffic trends, identify top consumers, track response times, and detect potential issues. You’ll also inspect detailed logs to analyze request and response data for troubleshooting or optimization.
Step 1: View the Global Analytics Dashboard
-
In the APIM console, with the Development environment selected on the top left, go to the Analytics page where you can see the Global dashboard. Select a time duration for which you can see some analytics. This Global analytics dashboard shows the statistics for all the APIs in that environment.
-
Review the following stats:
- Response status ranges and their distribution in a pie-chart
- API stats such as response time (maximum and average), latency, and total API calls
- Top APIs: the APIs that are invoked the most
- Top applications: The applications that has invoked the APIs most number of times
- Top overhead APIs: APIs with highest latency/overhead
- Top failed APIs: APIs that have returned a 5xx error most number of times
- Top slow APIs: APIs ordered by the average response time
- Time series graph of Response statuses and Response times
-
You can update the layout of this page, temporarily by clicking on the cross icons for each widget, or by dragging and moving them around. These changes are not saved when you refresh the page. In order to permanently change the layout, go to Settings > Analytics page.
-
Select the Global dashboard.
-
Now, you can drag and move the widgets around. Click on the cross icon to remove the Tenant repartition widget.
-
To preview the changes, click on ENABLE PREVIEW.
-
Enter the from and to timestamp, and click APPLY.
-
If the changes looks good, click on DISABLE PREVIEW, scroll down and click on SAVE.
-
Go back to the Global Analytics dashboard, and verify the changes. The Tenant repartition widget should not be shown.


Step 2: Access the Platform Logs
-
Click on the Logs tab. Select a time duration for which you can see some logs. This Platform logs dashboard shows the logs for all the APIs in that environment.
-
Each row in this page shows an API request with following details:
- Date and time stamp of when the request was made.
- Response status, e.g. 401 or 200
- API which was invoked
- Application which made the API request
- Plan used to make the API request, e.g. API key plan or JWT plan
- Method and Path, e.g. GET /item/info?sku=ACME001. This includes the query and path parameters as well.
- Response time
-
You can filter the logs, by providing fields like Method (e.g. GET), or HTTP Status (e.g. 401) and clicking on SEARCH.
-
Click on the Date link on any of the rows to open the log details.


Step 3: Access the API level Analytics & Logs
-
Select the Dashboard to open the Global analytics dashboard, also called the Platform dashboard. Set the time duration and click on the ACME Item Info API from any of the widgets, e.g. Top APIs. You will be navigated to the API > Analytics > Overview page, which is the API dashboard.
-
You will find that some of the stats are similar to the Platform dashboard, but some are specific to API dashboard. Review the following stats:
- Top plans: Number of API calls made to each of the plan (e.g. API key and JWT)
- Top paths: API calls made to each endpoint path (e.g. /info or /notification)
- Top slow applications: Applications based on average response times
- Time series graph of Hits by application.
-
Click on VIEW LOGS button in the Overview page, or click on APIs > Analytics > Logs from the left navigation menu to open the API level logs page.
-
With the time duration set (e.g. 30 days), provide a filter criteria to filter out logs with 429 as the HTTP status, as shown below.
-
Click on the Date link on any of the rows to open the log details. Click on Show context to view the application and gateway details. You will find that the request and response body (or payload) is not shown by default. You will need to configure logging to view the payload.
-
Select Back to Logs, and then select Configure the Logging.
-
Select Enable Logging toggle. You can configure the logging based on your need, and click Save and then Deploy API.
- Client only (i.e. between client and gateway), Proxy only (i.e. between gateway and the backend service), or both
- Headers only, Payload (or body) only, or both
- Request only, Response only or both
NOTE
Use logging with caution and only for development purposes, since it can impact API performance if you keep logging of payload as enabled at all times. Since you are in the Development environment, you can enable it for now. If you want to enable logging of payload in Production, make sure you disable it before the API is publicly accessible. -
Changes made in the logging level will only reflect for API calls made after the logging configuration changes. Go to Postman, and invoke the API a few more times.
-
In the APIM console > Logging configuration page, click on Go to Logging Dashboard. Click on the Date link for one of the recent API requests.
-
You will find the Headers and Payloads information for both Requests and Response, shown for both Client and Proxy.


Step 4: See Analytics & Logs in Developer Portal
-
As an API consumer (ChocoMart), login to the Developer portal (in the incognito browser) to view the API analytics and logs specific to the applications created by the consumer.
-
Click on Applications, and then select the ChocoMart mobile app.
-
Click on Analytics tab.
-
Select a time duration/range to view the application level analytics. The information shown is very similar, but this is specific to the application, and accessible to the API consumer.
-
Click on Logs tab, and configure the filters to view the application level logs. Click EXPORT IN CSV FORMAT to export the logs.


You finished this section - great job! You have successfully viewed platform and API analytics, as well as logs in the APIM console. You have also impersonated the API consumer to view application level analytics and logs in the developer portal. Continue to the next module to learn how you can configure Health checks and create a Custom dashboard.
Module 7: Configure Health Checks & Custom Dashboard
What You’ll Learn
We’re still in the Monitor phase of API management. In this module, you’ll learn:
- How to create and schedule API health checks
- Customizing dashboards to display key metrics
- Visualizing trends and alerts for proactive monitoring
- Using dashboards to support SLA tracking
Scenario
ACME wants to ensure its APIs are healthy and available around the clock. In this module, you’ll configure automated health checks that periodically validate API endpoints and alert administrators if downtime occurs. You’ll also design a custom API dashboard that highlights the KPIs most important to ACME - such as uptime, response time, and active subscriptions - giving stakeholders a real-time operational view.
Step 1: Configure Health Check
-
In the APIM console, go to APIs > ACME Item Info API > Backend services > Health-check page. Enable health check toggle.
TERM - Health Check
Health check functionality in API Management helps you to ensure that your backend services are up and running 24x7, or in other words, it helps you to monitor the availability and health of your endpoints. -
Set a Trigger interval, e.g. 5 seconds. Configure the HTTP method as GET, and Path as “/”.
-
In HTTP Headers, add key as Authorization, and value as Bearer . This is required to send a periodic API call to the backend service in integrator.io at the set interval.
-
Save the changes and Deploy API.
-
Click on Go to Health check dashboard button.
-
You should be able to see the availability of your endpoint in the Health check dashboard.


Step 2: Configure Custom Dashboard
-
In the previous module, you’ve accessed the platform, API and application dashboards. You can also build custom dashboard (of Platform, API or Application level) in APIM. Go to Settings > Analytics page.
-
Click on ADD A NEW API DASHBOARD to create a new API level custom dashboard.
-
Enter a Dashboard name and Query filter as shown below. Click on the + button on the bottom right corner to create a new widget.
-
Select the widget type as Pie. Configure the new widget by providing below details.
- Name: API calls with errors
- Field: HTTP Status
-
Select ENABLE PREVIEW. Provide a date range and hit APPLY. You should be able to preview the error details in a pie-chart.
-
Click on DISABLE PREVIEW, and then on SAVE, to save the dashboard.
-
Go to APIs > ACME Item Info API > Analytics > Overview page. Select the custom Error dashboard from the drop down on the top right corner. Change the time range to view the error dashboard data.


You finished this section - great job! You have successfully configured Health check as well Custom Dashboards in APIM console. Continue to the next module to learn how to set notifications and view audit trails.
Module 8: Set Notifications & Audit Trails
What You’ll Learn
This is the last module of the Monitor phase of API management. In this module, you’ll learn:
- How to configure event-based notifications and alerts
- Setting thresholds for performance or error events
- Viewing and filtering audit trail entries for governance
- How audit and alert mechanisms support security and compliance
Scenario
To maintain compliance and operational awareness, ACME needs clear visibility into all activities within APIM - who changed what, and when. You’ll configure notifications for key events (like new subscriptions, credential expiry, or error spikes) and explore audit trail logs that record every administrative or configuration change. This ensures accountability and helps meet internal and external audit requirements.
Step 1: Create Portal Notifications
-
Portal notifications are used to send notifications to API consumers logged in to the developer portal. Go to Settings > Notifications Settings page, and click on the pencil icon to edit the notification setting.
-
In Edit Portal Notification, select the checkbox for User Registration Request. This will send a notification to the developer portal, when a new user is created and automatic validation is disabled.
-
Click on Save.
-
You can also configure Portal Notifications specific to an API. Go to APIs > ACME Item Info API > Notifications settings. Click on the pencil icon to edit API level portal notifications.
-
Select check-boxes for API-Key Expired and New Subscription. This ensures that a notification is shown in the developer portal, when the API key has expired or a new subscription is received.
-
Click on Save.


Step 2: Create Email Notifications
-
In the APIs > ACME Item Info API > Notifications settings page, click on the pencil icon for Default Mail Notifications.
-
You will find the events are auto-selected for which an email notification will be sent to the service account email id, which you had configured in the Pre-requisites Module.
-
Uncheck any boxes for which you don’t want to send email notifications, and click on Save.
-
You can also create Email notification at the environment level (i.e. for all your APIs). Go to Settings > Notification settings. Click on + Add notification.
-
With Notifier set to Default Email Notifier, enter a name - Custom mail notification. Click on Create.
-
In the Edit Custom mail notification dialog, you can select any event for which you want to be notified over email. You can enter your service account email and click Save.


Step 3: Create Webhook Notifications
-
In Settings > Notification settings page, click on + Add notification.
-
Enter a notification name - Custom webhook notification. Change Notifier to Default Webhook Notifier. Click on Create.
-
Enter a URL in the Webhook field where a POST call will be made by APIM. Select relevant events that you want to subscribe to, and click on Save.

Step 4: View Audit Trails
Audit trails help in monitoring API & platform activity, tracking configuration changes, user actions, and consumption, offering chronological records for analysis, debugging, and compliance, helping identify issues and revert changes using analytics. It captures both platform-wide and API-specific events.
-
Go to APIs > ACME Item Info API > Audit page.
-
Use the Event drop down to select any event for which you want to track who made the changes. For example, if you want to see who had created the new JWT plan in this API, select PLAN_CREATED from the drop down. Enter a Date range if required.
-
Click on the eye icon under Patch to view more detail on each audit trail activity. Click on the cross icon to close it.
-
In the left navigation menu, under Audit, select History.
-
Select any of the snapshots from the history.
-
In this page, you have the option to Rollback to this previous version, or view the difference between that version and the current version of the API.


You finished this section - great job! You have configured Portal, Email and Webhook Notifications in APIM console. You have also viewed the Audit Trail and History features in API Management.
Completion
Congratulations! You've finished your Getting started with API management Builder Lab and are now ready to start solving real world automation challenges using APIs. You've earned another chocolate bar!
Please let us know you completed this lab by replying to this topic below with "COMPLETED". We'll validate and then mark the badge on our profile here in Connective. We'd also love to hear any other feedback you might have, so please do tell.
If you are ready to take the next step, we suggest as the next follow-up to tackle lab 301 - Building a RAG Solution with Celigo AI. It extends on many of the concepts you've just learned.