Introduction

This hands-on lab is designed to help intermediate-level builders - business technologists with little or no coding experience - get started with API development using Celigo’s API Builder. By following step-by-step instructions, you’ll learn how to quickly design, configure, and deploy APIs that solve real business problems.
You’ll play the role of an API builder at ACME Chocolatiers, a fast-growing confectionery company seeking to modernize its operations. From order tracking to internal data services, you’ll explore common API patterns that support digital business initiatives.
This lab focuses on practical application. Each exercise includes a scenario that frames a business need, followed by a guided build using Celigo's low-code interface. You'll build APIs that:
-
Handle public requests from customers
-
Enable secure data exchanges with partners
-
Aggregate data from multiple sources
-
Support internal developers with reusable services
No programming is required, but you'll gain exposure to key API concepts such as HTTP methods, relative URIs, query and path parameters, request and response body. Whether you're looking to improve customer experience, streamline operations, or empower developers, these labs provide the foundational skills to start building immediately.
Getting Help
Builder Labs are designed to be self-guided, but you don’t have to learn alone. If you ever get stuck, there are few ways to get support and keep moving forward:
-
Ask in the Community
Use this community to post your questions, share what you’re working on, and learn from fellow builders. Chances are, someone else has faced the same challenge and can help you out. -
Join Office Hours
Celigo hosts regular Office Hours where you can bring your questions directly to our experts. Check the Upcoming Events for upcoming sessions and drop in whenever you need hands-on guidance.
All of these resources are linked right here in the Celigo Community - so if you need help, you’re already in the right place.
Technology Overview
Modern digital businesses rely on APIs to connect systems, expose data securely, and enable innovation. To ensure APIs are scalable, secure, and manageable, organizations adopt a Full Lifecycle API Management approach. This lifecycle includes four key phases: Build, Secure, Socialize and Monitor.

Celigo's API Builder focuses on simplifying the first phase - Build - for business technologists. With its low-code interface, API Builder enables users to:
-
Visually define routes and methods
-
Define business logic using the builder canvas
-
Secure endpoints with authentication options
-
Deploy APIs directly from the platform
While Celigo also provides features that support the other phases of API management, this lab centers on helping you get hands-on experience with designing, implementing and testing APIs using real business use cases.
Hands-on Lab Overview
ESTIMATED TIME : 2 hours (all modules)
These hands-on exercises are designed for intermediate-level builders and focus on real-world use cases that demonstrate key capabilities of Celigo’s low-code API development platform.
- Prerequisite: Set up the Lab Environment
- Module 1: Create an API to fetch Product Pricing
- Module 2: Create a composite API to fetch Product and Supplier Info
- Module 3: Customize error responses in your APIs
- Module 4: Reuse existing custom API using Celigo APIs connector
- Module 5: Promote your APIs from Development to Production
- Module 6: Create new versions and deprecate your existing APIs
These modules are progressive - each module will teach you a new pattern in designing robust, scalable APIs using Celigo. Although you can finish the entire lab in 2 hours at a stretch, you may complete them at your own pace.
Prerequisite: Set up the Lab Environment
What You’ll Learn
Before building APIs, you'll need to create a free Celigo trial account and access API Builder. In this module, you'll set up the Lab environment and perform the prerequisites which will help you progress the next set of modules.
You’ll learn how to
-
Create your free trial account in Celigo
-
Create a new environment
-
Connect to Airtable
-
Connect to Slack
-
Verify connections are online
Note: If you have already completed Getting Started with Flow Builder and have set up your lab environment, you can only follow Step 2 (Configure a new environment) and Step 4 (Configure an external tool to test API) in this Prerequisite section.
Scenario
You’ve recently joined ACME Chocolatiers as an API developer. The company has been rapidly expanding its digital footprint and now needs to provide seamless access to product data and operational workflows. Before you can start building APIs, you need to set up a secure, isolated development environment where you can experiment without affecting production.
You’ll also prepare the apps and systems (like Airtable for product and supplier data, and Slack for team communication) that will be integrated into ACME’s ecosystem, ensuring your lab is ready for real-world scenarios.
Step 1: Create Your Celigo Free Trial Account
If you do not already have an account for Celigo, follow these instructions to procure your free trial.
-
Visit https://integrator.io/signup.
-
Complete the registration form with your name, company, and email address.
REQUIREMENT
Please use a valid business email address for this step.
-
Check your inbox for an activation email and follow the instructions to set up your password.
-
Once activated, you will be logged into https://integrator.io.
-
After logging in, click your profile icon in the top-right corner and select Subscription.
-
Ensure that API builder is listed among the features.

Step 2: Configure a new environment
-
Click on the profile icon and select Environments.
-
Click on + Create environment and enter a name - Development, and a description of the new environment.
-
Click on Save to create the environment.
-
Enable the environment by clicking on the toggle for Status.
-
On the top-right of the screen, select the word Production. A drop-down list appears. From the list, select Development. This takes you to the Development environment in integrator.io.

Step 3: Connect to endpoint apps
To help you build, test, and understand APIs effectively, we’ve selected two powerful but beginner friendly tools: Airtable and Slack. Both platforms offer free trials, making them perfect for experimentation without the need for paid accounts or setup overhead. By using Airtable and Slack, you’ll be working with real-world tools that make it easy to build, visualize, and test integration patterns all without writing code.

Slack is a popular messaging tool used by teams to communicate in real-time. Here, you'll use it as an endpoint for your API - delivering notifications about products, inventory, and alerts directly into Slack channels using Celigo’s API builder.
Create a new Slack Workspace
This lab uses Slack as a way to send interesting business events to other users within ACME Chocolatiers.
-
Sign up for a free account in Slack - https://slack.com. Click Create a new workspace. Sign in with your personal email ID. Enter the OTP sent to your email address.
-
Name and set up your Workspace: After logging in, click Create a workspace. Name your workspace (e.g., ACME Chocolatiers). Enter your name. When prompted to invite colleagues, you may skip this step.
-
Choose Start with the limited free version. Close the initial tutorial by clicking the X icon.
-
Create a Slack App here - https://api.slack.com/. Click Your apps at the top-right corner.
-
Select the Create app button. Select From scratch.
-
Name your app, e.g. ACME. Select your workspace from the dropdown, and create the app.
Create Connection to Slack
-
In Celigo integrator.io go to Resources > Connections.
-
Select Create connection. Choose Slack. Name your connection, set API type to Web methods, and Auth type to OAuth 2.0.
-
Click Configure scopes. Add relevant bot scopes in the scopes editor - calls:read, calls:write, channels:read, im:history, im:read, im:write, users:read, users:write. Click Confirm.
-
In the User scopes field below Configure scopes, select - channels.write, chat.write.
-
Click Save & authorize. This allows the app to post messages and manage channels, and more such operations.
-
After clicking Save & Authorize, a popup window will appear. Ensure the correct workspace is selected in the top-right corner, and then click Allow.
-
Your Slack connection is now ready.


Airtable acts as a simple, cloud-based database that combines the power of a spreadsheet with the flexibility of a relational database. In this lab, you'll use it to store and retrieve product and inventory data through its clean and easy-to-use API.
Create a new Airtable app
-
Sign up for a free account in Airtable (https://airtable.com/). You need not enter payment information in order to sign up for the free trial.
-
Do not use the AI prompt, we’ll use some ready to use csv files that you can download from here and upload in Airtable. Navigate to the home screen of Airtable by clicking on the Airtable icon on the top left.
-
You will see a button on the bottom left called + Create. Click on it.
-
Choose the option Build an app on your own.
-
Please use the files provided here Google Drive Link
-
The CSV file that should be uploaded first is called Products-Grid view.csv
-
Download this file.
-
-
Click on the + Add or import icon. Choose CSV file from the drop down options.
-
In the dialog box that opens, click on Browse files to upload the CSV.
-
Click on Upload file button and then on Next. Then click on Import to confirm.
-
Repeat the same steps with Suppliers-Grid view.csv, ensure you choose the option + Add or import.
-
Double-click on each of the table names, to rename the tables you have imported as Products and Suppliers respectively. You will need to pass the table names in the following modules to lookup information from these tables.
-
Select the Airtable Profile icon on the bottom-right, then select Builder Hub > Developers > Personal access tokens.
-
Select the + Create token button. Name the token as per your choice.
-
Click + Add a scope to add the scopes - data.records:read, data.recordComments:read, schema.bases:read.
-
A dialog box with a newly created token appears. Copy the token, select the Done button, close the panel and save the token securely. You will need it while configuring the Airtable connection in Celigo.


Create Connection to Airtable
-
In Celigo integrator.io go to Resources > Connections.
-
Select Create connection. Choose Airtable. Name your connection, select API type as User info, Auth type as Token, and enter the token that you saved earlier.
-
Click on Test connection and then Save & close.
-
Your Airtable connection is now ready.

Verify Connections are online
-
The Connections list should show both connections and their status. Confirm the Slack and Airtable connections are online in the Development environment.
- If both are online, continue to the next step.
- If not, follow the previous steps to configure the Slack and Airtable connections.
Note that you will need to configure the connections in the other environment (i.e. Production) separately in a later module.
Step 4: Configure an external tool to test API
In this exercise, you’ll use Postman to test the API endpoint that you will build here.
-
In order to sign up, enter your work email, username and password here - https://identity.getpostman.com/signup.
-
Click Create free account to confirm registration.
-
Verify your account by entering the verification code sent to your email.
-
Fill in the introductory questions and select Continue with Free Plan if you don’t want to upgrade.
-
Click on Get started, and you’re ready to test the API

SUCCESS
You finished this section - great job! You have all the prerequisites to build and test a new API using the low code API builder tool.
Module 1: Create an API to fetch Product Pricing
What You’ll Learn
In this lab, you'll gain foundational skills in building and deploying a simple API using Celigo’s API Builder. You’ll learn how to:
-
Create a new API in Celigo API Builder
-
Configure path (or query) parameter in the API request node
-
Use transformation step to pass path (or query) parameter to the downstream steps
-
Add a lookup using Airtable connection
-
Map results into a structured API response
-
Test and deploy a public API endpoint
This lab is designed for intermediate-level builders and shows how to build real-time APIs that bring together multiple data sources.
Scenario
ACME Chocolatiers is partnering with multiple online distributors who need up-to-date pricing for products in order to display accurate information to their customers. As the API developer, you’re tasked with creating a public API that external partners can call to fetch real-time product pricing directly from ACME’s Airtable product catalog, by providing the SKU as input.
Instead of sharing static spreadsheets or manually updating partners, you’ll expose a secure API that ensures everyone always has access to the latest information - reducing errors, manual effort, and customer complaints.
Step 1: Create the API
-
In Celigo integrator.io, ensure you are in the Development environment by locating the environment name in the left sidebar menu, or in the environment selector on the top right corner of the screen. If your are Production environment, use the environment selector to go to the Development environment.
-
From the sidebar menu, navigate to Resources > APIs.
-
Click Create API.

NOTE
If you already have a free Celigo integrator.io account and the trial has expired, you won’t see the API builder option. Reach out to a Celigo representative for support.
-
In the Create API form, enter:
- Name: ACME Item Info API
- Description: Fetch pricing for a given item
- Version: v1
-
Click Next. You’ll be taken to the API Builder canvas. You can see an API request node and two API response nodes - one for success and one for error. The API name, description and version that you entered is visible on the top left corner of the screen.


Step 2: Configure the API Request Node
-
Click the API request node (first box in the API builder canvas which has Configure written over it)
-
Configure the API request:
-
HTTP method: GET
-
Relative URI: /item/info
-
Query parameter: sku (Description: Stock Keeping Unit, e.g. ACME001)
-
-
Select Mock API request on the right panel. Update a valid SKU (ACME001) from your Airtable > Products table.
 TERM - Mock API Request
Configuring the mock API request helps in previewing the data in all the downstream steps, as well as testing the API once it has been built. Replace the sample data with some test data. -
Select Preview and then click on Send button to view the parsed output and the mock HTTP request for testing.
-
Save & close the API request node.


Step 3: Add Transformation Step
-
On the API request node, select the ellipsis and choose Transformation.
-
With Rules 2.0 selected at the top, map the query parameter:
-
Output field: sku
-
Input field:
- Enter handlebars “{{“ to access the query parameter.
- Select queryParams to expand it.
- Select sku listed underneath it, as shown in the screenshot.
- You should see {{queryParams.sku}} being populated in the input field.
-
Click on Preview to see the output (see below), which should be the same value which you have provided in the previous Edit mock API request step.
-
Click Save & close to save the transformation. This step makes the query parameter sku available to all downstream nodes in API builder.
-


Step 4: Lookup Pricing and Item Info from Airtable
-
Click + after the Transformation step. Choose Add destination / lookup.
-
Select Airtable from the list of applications, choose Look up additional records (per record) in Flow step type. Enter the name and description (shown below**)**, and click Next.
-
Name: Fetch pricing and item info
-
Description: Fetch pricing and inventory info for an item from Airtable
-
-
Select the existing connection to your Airtable instance from the dropdown, or set up a new connection by following steps in Prerequisite section.
-
Under What would you like to export, select/enter:
-
Resource: Base data - Records
-
API endpoint: List records
-
-
On selecting the endpoint, you will see the path parameters (Base ID, and Table ID or name) for that Airtable endpoint. Enter the value for the path parameters from Airtable.
-
Base ID: . In the Airtable API documentation page - https://airtable.com/developers/web/api/introduction, scroll down to see your workspace. Select the Workspace, and in the page that opens you will find the base id which starts with “app****”.
-
Table ID or name: Products
-
-
Add a query parameter filterByFormula from the dropdown. Provide the value as
{SKU}='{{record.sku}}'. -
With Preview tab selected, click on Send, to preview the data from Airtable.
 PRO TIP
The Preview here is using the SKU that you entered in the Mock API request. You can go back to Mock API request in the prior step or click Edit mock input in this current step to enter a different SKU (e.g. ACME002), and then try Preview again to see how that data will change when a different SKU is used. -
Save & close the window.
-
Click on the ellipsis menu for the newly added lookup step and choose Results mapping, to add the lookup response fields to the source record.
-
Add the following mapping. Then Preview the output and click Save & close.
-
data.0.fields.Product Name → itemName
-
data.0.fields.Inventory Level → inventory
-
data.0.fields.MSRP → price
-


When you expect a single record back from the lookup it's advised to use data.0 or if you are expecting an array of records it’s advised to use data to merge complete data back into the source record.
Step 5: Configure API Response Node (Success & Error)
-
Open API response node - Success Response
-
In the Configure API response section, set:
-
HTTP status code: 200 OK
-
HTTP response body: Add fields to schema manually. Click on + button to add new rows to add all the fields as shown below. To change the datatype of any of the fields, click on string and then choose any other datatype from the dropdown.
- sku (string),
- item (string),
- inventory (number),
- price (string)
PRO TIP
You can upload a JSON file to automatically add fields to your API request and response body schemas. You will need to click on Choose file button and then select a JSON to upload it and auto-populate all the fields and their datatypes. -
-
Click Send under Preview, and then Save & close.

Step 6: Map source fields to API response fields
-
Click on the ellipsis for the Success response node and choose Mapping.
-
Map the source record fields to response record fields. Make sure the data types are as shown below. Preview the mapping and click Save & close.
- sku (string) → $.sku (string)
- item (string) → $.itemName (string)
- inventory (number) → $.inventory (number)
- price (string) → $.price (string)


To quickly auto-map the fields, select Auto-map destination fields button, located to the right of Refresh fields. Then Select all fields and then confirm by clicking Auto-map selected destination fields.
Step 7: Test the API
-
Select Run test button to verify the API using the mock API request that you configured earlier in the API request node.
-
Click on any of the nodes (e.g. lookup), and then on View debug logs link on the top right corner to see the Test run debug logs. Click Close to return to the API builder canvas.
-
Click on any of the node steps, e.g. Results mapping or Transformation, to view the Test run results. Click Close to return to the API builder canvas.


Step 8: Test the Endpoint using an external tool
-
Open the API request node (named ACME Item Info API) and click Send under Preview tab.
-
Go to the HTTP request tab and click on the Copy icon on the bottom right corner of the panel, to copy the cURL command (shown here). Close the API request node.
-
In Postman,
-
Choose a workspace, e.g. My Collection.
-
Click on Import, and paste the cURL.
-
Select Import into Collection in the dialog that opens.
-
-
You should see the API endpoint URL with the query parameter already configured. Next, you will need the Celigo API token to authenticate the API request externally in Postman.
-
In Celigo, go to Resources > API tokens page from the sidebar menu, and select + Create API token.
-
Add a name (e.g. ACME test), select any duration in Auto purge token, and set the Scope to Custom. Click the APIs drop-down option to select the API you’ve just created. Save & close the panel.
-
In the Token column, click on Show token to view the API token, and then copy the token.
-
In Postman, open the Authorization tab. Paste the API token with Auth type selected as Bearer token.
-
Hit Send. You should get a 200 OK success response code, with a response body that incudes the item price and inventory information for the SKU that you’ve passed as a query parameter.


Step 9: Download the OpenAPI specification
-
In Resources > APIs page, for the newly created API, click on the ellipsis in Actions column.
-
Select Download OAS.
TERM - OpenAPI Specification (OAS)
The OpenAPI specification is a widely accepted standard for defining RESTful APIs. It is automatically generated in API builder based on how you have configured an API. -
Open the downloaded yaml file in a text editor. Alternatively, visit Swagger editor (https://editor.swagger.io/). Select File > Import file and choose the file.
-
Review the contents of the file based on what you have provided in the previous steps. It should include:
- title (or API name),
- description, version,
- server URL, path,
- security (or authentication mechanism),
- HTTP method,
- query parameter(s),
- response codes, and
- request/response body schema.


You finished this section - great job! You have successfully built an API using the low code API builder tool. Continue to the next module.
Module 2: Create a composite API to fetch Product and Supplier info
What You’ll Learn
You’ll create a composite API by updating the simple API you’ve created in the previous module, to also retrieve supplier information from a dedicated Airtable supplier table, and return the combined information as API response.
A composite API allows for the execution of multiple API requests within a single API call. Instead of making separate, sequential calls to different API endpoints, a client can send one request containing a series of sub-requests, and receive a single, consolidated response.
Scenario
ACME’s external distributors not only want pricing data but also need visibility into supplier details to help with inventory planning and sourcing decisions. For example, a distributor may want to know which supplier provides a specific chocolate ingredient, along with their lead times and contact info. In this module, you’ll enhance the pricing API you built earlier to also fetch and return supplier data from a dedicated Airtable table.
This composite API will give ACME’s partners a single, unified response that includes all the product and supplier information they need - improving efficiency and reducing the number of API calls required.
Step 1: Add another Lookup Step to Fetch Supplier Info
-
In Celigo integrator.io, go to Resources > APIs page.
-
Click on ACME Item Info API to open the API builder canvas.
-
Select + after the Lookup step - Fetch pricing and item info. Choose Add destination / lookup.
-
Select Airtable from the list of applications, choose Look up additional records (per record) in Flow step type. Enter the name and description, and click Next.
-
Name: Fetch supplier info
-
Description: Fetch supplier info from Airtable
-
-
Select the existing connection to your Airtable instance from the dropdown.
-
Under What would you like to export, select:
-
Resource: Base data - Records
-
API endpoint: List records
-
-
Enter the value for the path parameters from Airtable.
-
Base ID: same as how you provided it in the previous module.
-
Table ID or name: Suppliers
-
-
Add a query parameter filterByFormula from the dropdown. Provide the value as:
{Products Supplied}='{{record.itemName}}' -
Preview the changes, and click on Save & close.
-
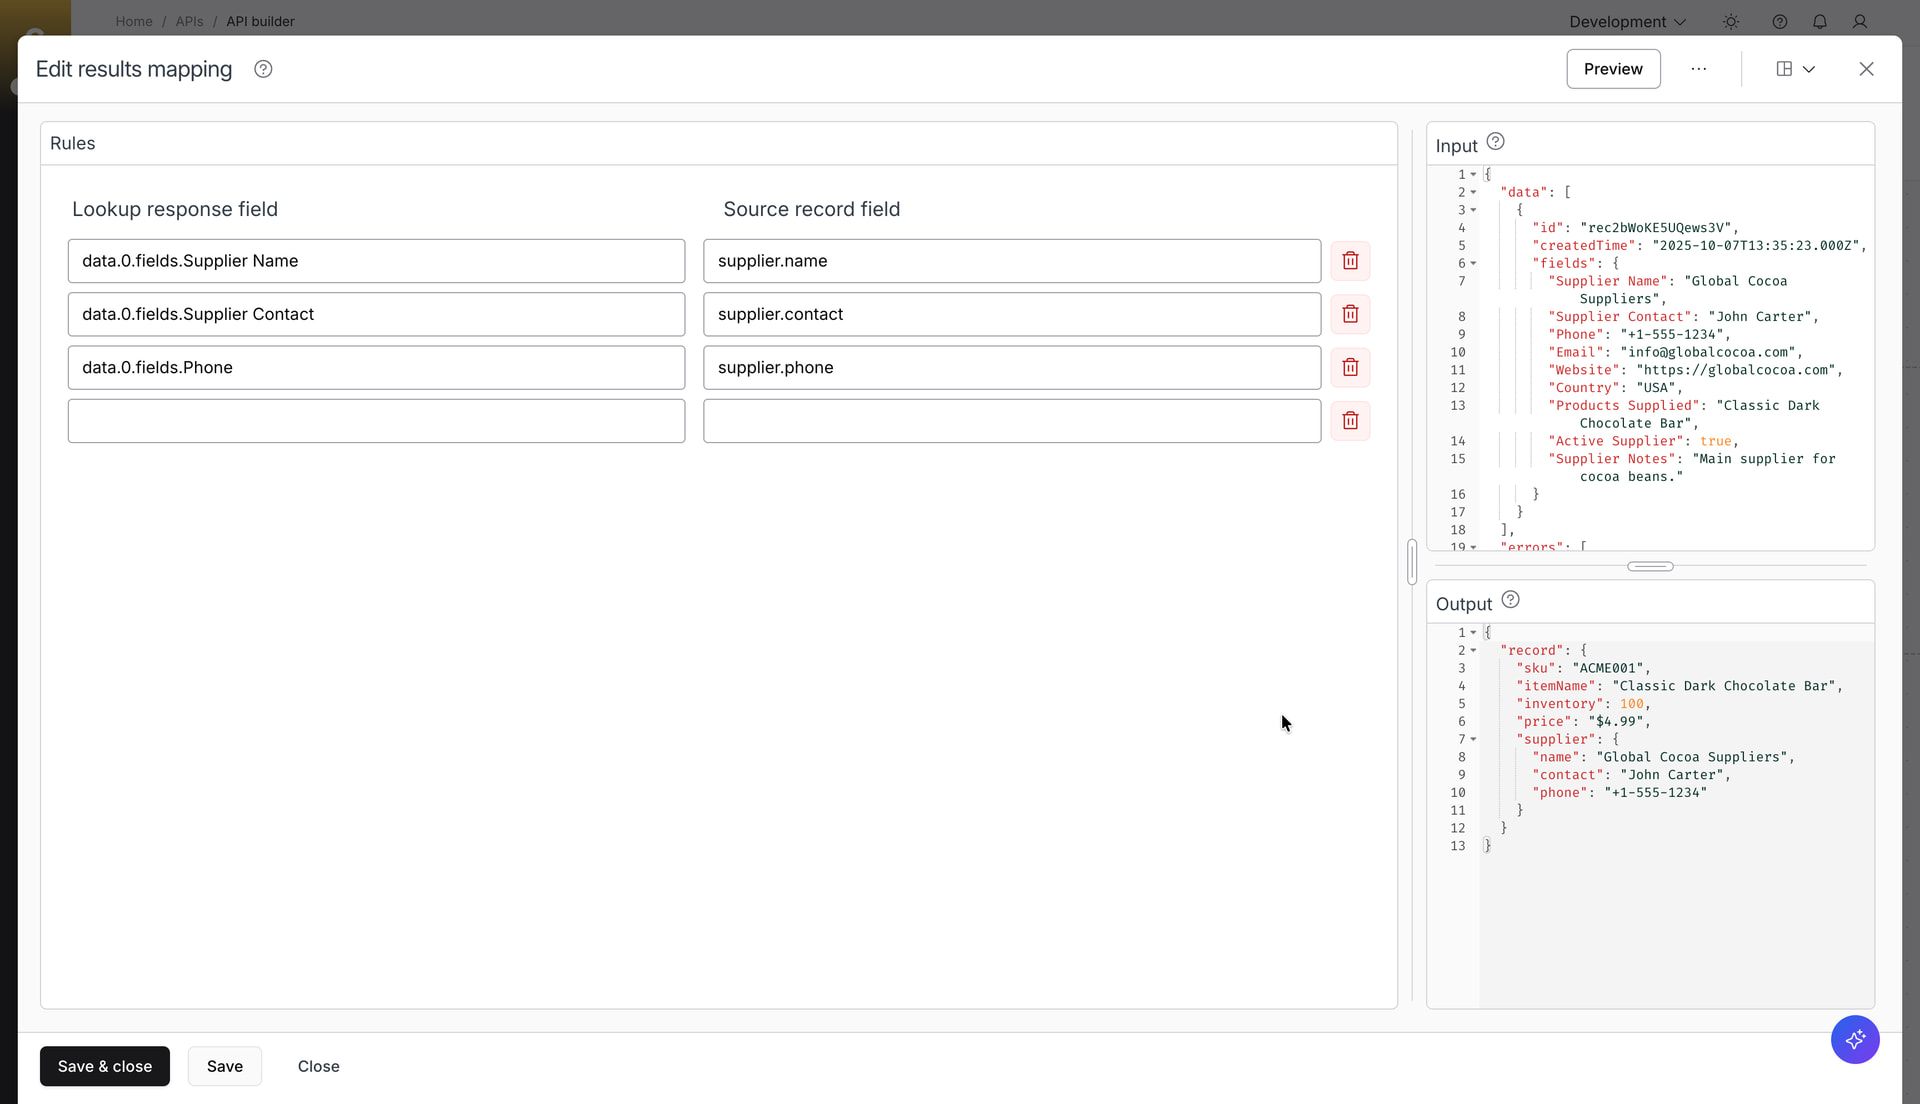
Click on the ellipsis menu for the newly added lookup step and choose Results mapping.
-
Add the following mapping to add the lookup response fields to the source record.
-
data.0.fields.Supplier Name → supplier.name
-
data.0.fields.Supplier Contact → supplier.contact
-
data.0.fields.Phone → supplier.phone
-
-
Preview the output and then click on Save & close.


Step 2: Update API Response Body Schema with Supplier info
-
Open API response node - Success Response.
-
In the Configure API response section, scroll down to HTTP response body section. Add new fields to schema manually. Click on + button to the right of price field to add a new field supplier. Change the datatype from string to object.
-
Expand the supplier (object) by selecting the caret-down icon, and add below fields. Optionally add the description fields.
-
name (string)
-
contact (string)
-
phone (string)
-
-
Click Save & close.
-
Since you are updating the previously defined response schema, against which an OpenAPI specification has already been generated, on saving, you’ll see the message - Response schema mismatch - a reminder to open the response node mapper and sync the new fields. Click on Ok.


Instead of updating the HTTP response body schema in the API response node, add the new fields when mapping the API response fields. Mapping is covered in the next step.
Step 3: Map newly added fields to API response fields
-
Click on the ellipsis icon for the Success response and choose Mapping.
-
Click on the + icon on the last row to add new fields for the supplier object as shown below. Map the newly added source record fields to response record fields.
-
Preview the mapping. Save & close the panel.

Instead of adding the fields manually, you can click on the ellipsis and select Auto-populate destination fields, and then on Auto-populate in the modal that opens. Then select Auto-map destination fields as shown below to auto-map all the fields.


When new fields are created or existing fields are updated in mapping which are not in sync with the HTTP response body schema, you will have an option to automatically sync the schema. When saving your work, select the Sync now button, as shown below.

Step 4: Test the API
-
Click Run test button to verify the API using the mock API request that you configured earlier in the API request node.
-
Click on each of the steps to see the test run logs - same as you did in the previous module.

Step 5: Test the Endpoint using an external tool
-
Open Postman to test the API which you have already imported in the previous module.
-
Ensure the API token is already entered with Auth type selected as Bearer token.
-
Hit Send. You should get a 200 OK success response code, with a response body that includes the item price, inventory as well as supplier information. If the API response is not as shown below, reread the previous steps, or reach out for help.

You finished this section - great job! You have successfully built a composite API using the low code API builder tool. Continue to the next module.
Module 3: Customize Error responses in your APIs
What You’ll Learn
You’ll explore all the different error handling options for the APIs and also how to customize the error response based on your business needs.
Scenario
As ACME Chocolatiers expands its API offerings, partners increasingly depend on accurate error reporting to troubleshoot issues. Imagine a distributor’s system calls your API without any SKU or with an invalid SKU.
Without meaningful error messages, they won’t know whether the problem lies in their request, in ACME’s data, or in the API itself. To improve developer experience and reduce support tickets, you’ll customize error responses to return clear, actionable messages.
Step 1: Add a Script to validate whether SKU is available
-
In Celigo integrator.io, go to Resources > APIs page to view the APIs built in the account. Click on ACME Item Info API to open the API builder canvas.
-
Click on the ellipsis for the API request node, and choose Transformation. Navigate to JavaScript on the top center of the panel.
-
Under Script, click on the + icon to the right of Function field, to add a new script. Enter a script name - Validate request parameter.
-
Under Script content section, note that the function stub is set to Transform already, as this step is a transformation. Click Save & close.
-
Copy below JavaScript snippet and paste it in the left panel, to validate whether the SKU is available in the query parameter. If SKU is not available then you can return a customized error - “SKU is required”.
function transform (options) { options.record.sku = options.queryParams.sku; if (!options.record.sku) { console.log("SKU is not available"); throw new Error('SKU is required'); } return options.record; } -
Click Preview on the top right corner of the panel to confirm whether the sku is mapped successfully, as shown below.
-
In the Function input column, remove the value of sku (as shown below) in the Function Input section, and click on Preview. Confirm whether the Error section shows the custom error you have configured in the script.
-
Save & close the Transformation step.


Step 2: Test API without sending SKU in API Request
-
Open the API request node. Select Edit mock API request. Remove the value for the query parameter - sku.
-
Save & close the panel, and also the API request node.
-
Select Run test to test the API with a mock API request without SKU information.
-
Click on the error link beside the red dot to view the Test run errors. You should see the error message that you configured earlier, and the error source as Transformation. Close the panel by clicking the x icon on the top right corner.
-
In the API builder canvas, click on the Transformation icon to view the test run results as well as the error stack trace, as shown below.
-
Invoke the API from Postman, after removing the value for the query parameter - “sku”. You will get an error response with the message which you have configured earlier.
-
Revert the changes made earlier in Mock API request in API request node, ie. provide the value of sku as “ACME001”. Save & close the panel and the API request node.


Step 3: Add Error Handling to return a custom Response Code when SKU is invalid
-
Test the API again from Postman by providing the value of “sku” as “ACME123” which doesn’t exist in the Airtable database.
-
Click on the ellipsis button and select View request logs to view the external API call and its response.
-
You will see a response code of 500 with the timestamp. Navigate to the API response tab and view the error details in the Body section. Make a note of the error code - “handlebars_template_parse_error”, and the message.
-
Since the error message is showing the endpoint path as /Suppliers, configure error handling for the Fetch supplier info step to return a customized error response code and message. Click on the ellipsis for that lookup step, and choose Error handling.
-
In the What should happen to a record if the lookup fails? dialog, select Proceed to the next application regardless. Click Save & close.
-
Edit results mapping for the same lookup step, in order to map the error code to the source record, which you can later use in a downstream step (i.e. Response picker) to route the record to its intended error response node. Save and close the results mapping UI.
- errors.0.code → error_code_lookup
TERM - Response Picker
The Response picker node in API builder is a special type of branching router placed just before the response nodes. Here, you can add new branches (with response nodes), and customize your logic to decide which branch the record should take. -
Open the Response picker branching node, as shown below.
-
Click on + Branch button at the bottom of the window, to add a new branch. Click on the pencil icon and name the new branch “Error response - 400”. Also rename the default success and error branches as shown below.
-
Drag and order the branches, as shown below, based on which branch condition needs to be evaluated first. This is because the record will flow through the First matching branch in the Response picker.
NOTE
In API builder implementation logic, there is a “success” boolean which is true by default, but changes to false if these is any error in any of the steps. The default success and error response branch condition is based on that success boolean. -
Click on + Condition to add a new condition for the branch Error response - 400.
-
Select the field record.error_code_lookup, which you had mapped in a previous step, from the drop down list. Configure the condition such that the field equals the error code handlebars_template_parse_error which you had noted in an earlier step.
-
Enter the error code value in the Input section, as shown below. Click Preview to confirm that the condition is working as expected. Save and close the Edit branching UI.
-
In the API builder canvas, you will see 3 response nodes, similar to how you have configured them in the Response picker. Click on the Error response - 400 response node to open it.
-
Set the HTTP response code as 400 - Bad request. Save & close the response node.
-
Click on the ellipsis icon for the Error response - 400 and choose Mapping.
-
Add a response record field - message. Click on the gear icon to open Settings. Change the Field mapping type to Hard-coded. Enter a custom value - “SKU is invalid”.


Step 4: Test API by sending invalid SKU in API Request
- Invoke the API from an external tool like Postman with an invalid SKU, e.g. ACME123.
- You will see a 400 - Bad request being returned with the body showing the customized error message as expected.
- Finally, test with a valid SKU, e.g. ACME001, to ensure the API is working fine even after making all these updates in error handling.

You finished this section - great job! You have successfully added error handling in your API. Continue to the next module.
Module 4: Reuse existing API using Celigo APIs connector
What You’ll Learn
You’ll create a new composite API in API builder to send notifications to Slack when inventory level is below a threshold, by reusing the existing API. You’ll also reuse an existing Celigo standard API in your custom API built using API builder.
Scenario
ACME wants to proactively monitor inventory levels to avoid stockouts, which can damage partner trust and customer satisfaction. You’ve been asked to create an API that triggers notifications in Slack whenever inventory for a product falls below a certain threshold.
Rather than building everything from scratch, you’ll reuse the ACME Item Info API you’ve already built via the Celigo APIs connector. This approach not only saves time but also demonstrates how ACME can accelerate their API-led integration strategies.
Step 1: Create a Celigo APIs connector
-
In Celigo integrator.io, go to Resources > Connections. Click on + Create connection.
-
Select the application - Celigo APIs (New!).
-
Enter a descriptive name - Celigo APIs connection.
-
Select Scope as Custom.
-
Click on APIs to open the drop down option, and select the ACME Item Info API which you have built in the previous modules. Save & close the connection.


Step 2: Create new API in API Builder
-
Go to Tools and select API builder.
Note: Alternatively you can click on + Create API in the Resources > APIs page or from the Homepage.
-
In the API builder canvas,
-
Click on New API to update the name to ACME Fetch Items and Send Notifications API
-
Click on the page icon button to the right of name and version and click on the pencil icon to add a description: Send notification to Slack when the inventory level is below 10.
-
-
Click on the API Request node to configure the request parameters.
-
Configure the API request:
-
HTTP method: GET
-
Relative URI: /item
-
Query parameter: sku
-
-
Click Mock API request and update a SKU (ACME001) from your Airtable > Products table.
-
Save & close the API request node.


Step 3: Add Transformation Step
-
Click on the ellipsis icon on the API request node. Choose Transformation.
-
Map the query parameter:
-
Output field: sku.
-
Input field: Enter handlebars “{{“ to access the query parameter and select it from the drop down menu: {{queryParams.sku}}.
-
Click on Preview to see the output and select Save & close to save the transformation. This step makes the query parameter sku available to all downstream steps.
-

Step 4: Reuse ACME Item Info API using Celigo APIs connector
-
Click + after the Transformation step. Choose Add destination / lookup.
-
In Create destination/lookup UI,
-
Select the application as Celigo APIs (New!).
-
Select Lookup additional records (per record) in Step type
-
Name your step: Fetch item info from Airtable
-
-
Select the connection which you have created in a previous step.
-
Select the Option - Invoke an API created in my account.
-
Select the API endpoint - ACME Item Info API.
-
Select the Query parameter sku from the drop down. Enter {{record.sku}} as value.
-
Preview, and save & close the panel.
-
Click on the ellipsis icon for the new step added to open the drop down options. Select Results mapping.
-
Map the lookup results to the source record, as shown below. Save & close the panel.


Step 5: Add a Slack Import to send Notification
-
Click + after the Fetch item info from Airtable lookup step. Choose Add destination / lookup.
-
Select Slack from the list of applications, choose Import records into destination application in Flow step type. Enter the name and description.
-
Name: Send Slack notification.
-
Description: Send Slack notification when inventory stock is below 10.
-
-
Click Next.
-
Select the Slack connection which you have configured in the Prerequisite section.
-
Select
-
Resource: Chat
-
API endpoint: Chat post message
-
-
Save & close the import.
-
Click on the ellipsis for the Send Slack notification import. Choose Mapping.
-
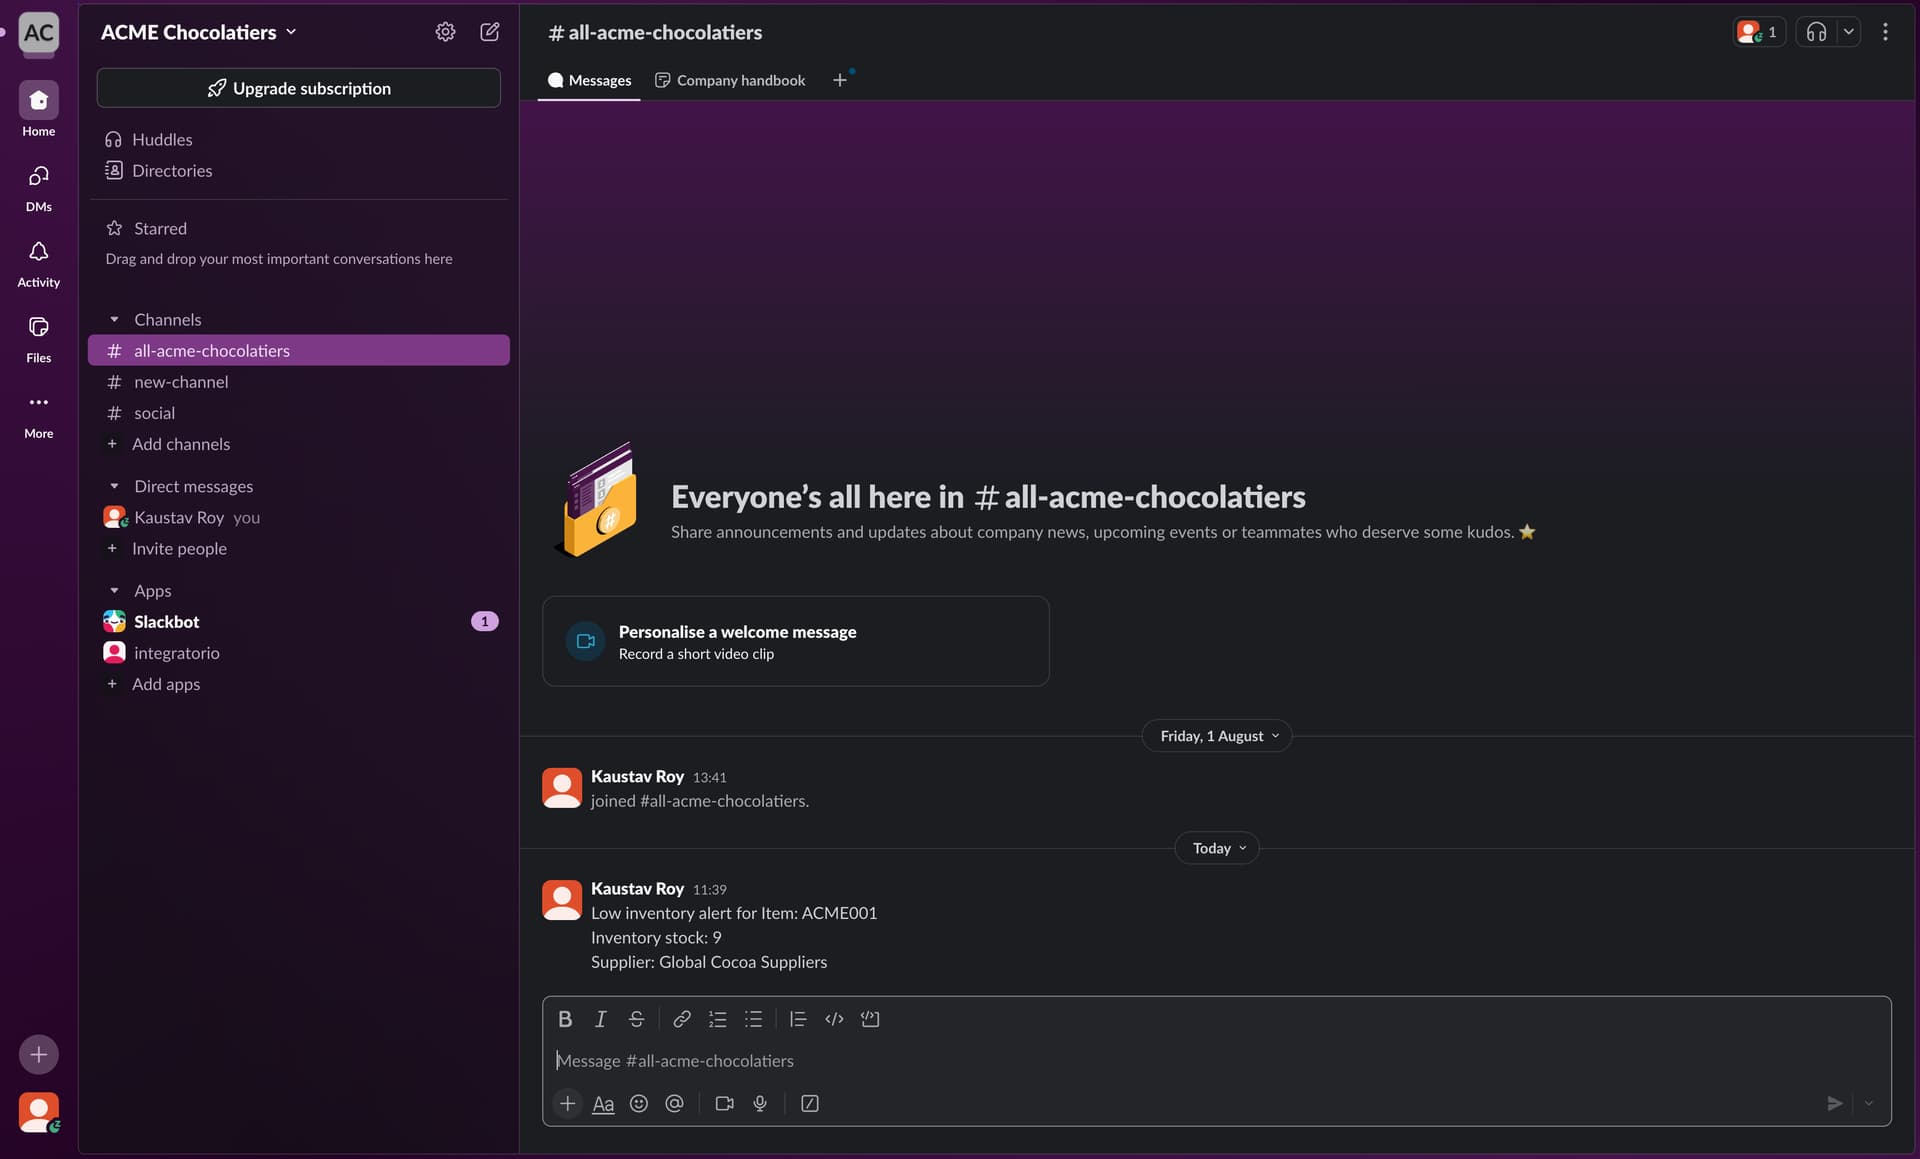
Open your Slack application by visiting https://slack.com/ and clicking on Launch Slack. Go to the channel where you want to send the notification and copy the Channel ID as shown below.
-
In the Mapping UI, map the channel and the text destination fields as shown below.
-
channel → Paste the Channel ID copied from your Slack application in the previous step.
-
text → Click on the gear icon to open Settings. Change the Field mapping type to Handlebars expression. Enter the following expression:
Low inventory alert for Item: {{record.acme.sku}}
Inventory stock: {{record.acme.inventory}}
Supplier: {{record.acme.supplier.name}}
-
-
Click on Preview to verify whether the mapping is done correctly. Save & close the panel.


Step 6: Add an Input Filter to only Send Notification when Stock is less
-
Click on the ellipsis for Send Slack notification import.
-
Choose Input filter, to filter records based on inventory count.
-
Click + Condition to add a new filter condition.
PRO TIP
Click on the layout icon on the top right corner (as shown above) to pick a layout of your choice based on how you want to view the panel sections - Rules, Input and Output. You can also drag the section dividers to expand any of the sections. -
Select record.acme.inventory from the drop down list of fields. Then select “is less then” from the drop down list of filter condition, and enter the value as 10, to configure the following filter condition.
record.acme.inventory is less than 10 -
To test whether the filter condition is working as expected, update the inventory count to 9 in the Input section and click Preview. The Output section should show TRUE: record will be processed.

Step 7: Test the API by updating inventory count in Airtable
-
Go to Celigo > Resources > API tokens. Click on the token you had created previously.
-
Click on APIs and select ACME Fetch Items and Send Notifications API, to add the token permission for the newly created API. Save & close the panel.
-
Go to Resources > APIs, click on the ellipsis icon for ACME Fetch Items and Send Notifications API, and choose Copy cURL.
-
Go to Postman and select your workspace. Click on Import, paste the cURL command, and then click on Import Into Collection.
-
In Celigo > Resources > API tokens, click on Show token to view the token. Copy the token.
-
In Postman, provide the API token with Auth type as Bearer token, as shown below.
-
Click Send to invoke the API. You should get a 200 OK response with the item information retrieved from the existing ACME Item Info API that have been reused in the new ACME Fetch Items and Send Notifications API.
-
In Airtable > Products table, double click on the below cell and update inventory level for ACME001 to 9 (or any number less than 10).
-
Column: Inventory Level
-
Row: Product with SKU as ACME001
-
-
Invoke the API again with the updated inventory count (which is below the threshold of 10).
-
Validate whether a Slack notification for “Low inventory alert” along with item information is being sent to the channel you have configured earlier.


You finished this section - great job! You have successfully reused an existing custom API using Celigo APIs connector, and sent a Slack notification based on an input filter condition. Continue to the next module.
Module 5: Promote APIs from Development to Production
What You’ll Learn
You’ll learn how to move your APIs from one environment to another while preserving its full configuration. You don’t have to manually replicate the setup, reducing the chance of errors and ensuring consistency.
Scenario
Your APIs are now critical for ACME’s external distributors, who rely on them for real-time data. But before rolling them out broadly, you must ensure that APIs move safely from the development environment (where you’ve been experimenting) to production (where real partners will consume them). Manual migration is risky and error-prone, as small misconfigurations could lead to downtime or incorrect data being exposed.
In this module, you’ll use Celigo’s deployment capabilities to seamlessly promote APIs between environments, ensuring consistency, reliability, and faster release cycles for ACME’s partners.
Step 1: Create Connections in Production environment
-
In Celigo integrator.io, on the top-right of the screen, click on the environment Development. A drop-down list appears. From the list, select Production.
-
Go to Resources > Connections.
-
Create and configure connections to Slack and Airtable, in the same manner as you have done earlier in the Development environment, as mentioned in the Pre-requisites section.
NOTE
The application credentials for development and production environments are ideally different. But for this exercise, you may use the same credentials. -
Verify the Slack and Airtable connections are Online. You can ignore any other connection that can show up in the Connections page since you will not use them in this exercise.

Step 2: Clone API from Development to Production
-
From the environment selector drop-down, select Development to navigate back to the Development environment where you have created and tested your API.
-
Go to Resources > APIs.
-
For the ACME Item Info API, click on the ellipsis to open the Actions menu drop down.
-
Select Clone API.
-
Update the name of the API that will be created when cloning is complete.
-
Enter a description for your choice - “API to fetch item pricing, inventory and supplier information to be used in Production environment”.
-
Select Production from the Environment drop down.
-
Enter the version - v1.
NOTE
The HTTP method, relative URI and version combination needs to be unique in a given environment. If this constraint is violated, you will see a message - Version name for this endpoint already in use in the selected environment. Try another one. -
Expand the sections below the Versions field to see which resources will be cloned.
-
Click on the Clone API button to start the cloning process.
-
In the Install page, select Configure to configure the Airtable connection that is being used in the API.
-
Use the existing Airtable connection that you’ve already created in the Production environment.
NOTE
If you have not yet set up the connection in the new environment where the API will be cloned, you can create the connection at this cloning step as well, as shown below. -
Save the changes. You will be navigated to the cloned API in the new (Production) environment automatically
-
Click on Run test button to verify whether all the dependent resources are also successfully cloned, and the API is executed as expected.
-
Similarly, promote the ACME Fetch Items and Send Notifications API from Development to Production environment.


You finished this section - great job! You have successfully cloned an API from the Development to Production environment. Continue to the next module.
Module 6: Create new versions and deprecate your existing APIs
What You’ll Learn
You’ll learn how to create new versions of your API in the same environment when you’re making breaking changes to your API, since otherwise it would impact your API consumers and also create long-term technical debt. You’ll also learn how to deprecate the older versions of your APIs once your API consumers have fully migrated over to the new version.
Scenario
Over time, ACME Chocolatiers wants to enhance its APIs with new features that involves a breaking change - for instance, adding a path parameter in the relative URI, or updating the business logic in the lookups used in the API. However, you can’t simply overwrite the existing API, because distributors are already depending on its current structure. To avoid disruption, you’ll create a new version of the API while keeping the old version live. This enables partners to migrate at their own pace.
Later, once all partners have transitioned, you’ll deprecate the older version. This approach ensures backward compatibility while still allowing ACME to innovate and evolve its digital capabilities.
Step 1: Clone API to create a new version
-
In Celigo integrator.io, click on the environment selector on the top right corner, and select Development.
-
Go to Resources > APIs. Click on the ACME Fetch Items and Send Notifications API to open the builder canvas.
-
Open the API request node, and update the Relative URI from /item to /items. Now, this is a breaking change which you don’t want to make in this current version (i.e. v1) of the API.
-
Click Close instead of saving the changes, and then select Discard changes in the dialog that opens.
-
Click on the ellipsis on the top right corner of the screen, and select Clone API.
-
Add the version as v2, keeping the environment unchanged.
-
Click on Clone API button to start the cloning process.
-
Click on Configure button for the Slack connection. Choose the existing connection and click Done to confirm.
-
Similarly configure the Celigo APIs connection, by choosing your existing connection.
-
You will be navigated to the API builder canvas for the cloned API. Review the version of this API at the top of the screen, to the right of the API name.


Step 2: Update your new API to make a breaking change
-
Make the changes to the API which you wanted to do earlier in a previous step, i.e. open the API request node and update the Relative URI from /item to /items.
-
Save & close the request node.
-
On the top-right the API builder canvas, click on the gear icon to open the API settings.
-
Update the API name and description as per your need.

Step 3: Deprecate your existing API
-
In the API settings page for the newly created v2 API, click on Download OpenAPI spec button to download, so that the OpenAPI specification can be shared with your API consumers. Save & close the panel.
-
Let’s say your customers and partners have started adopting the new API and have stopped using the existing API.
-
To verify the same, go to the APIs page, and select View request logs from the ellipsis for the v1 API, as shown below.
-
In the View request logs page, click on the filter icon for Time, and choose a duration, e.g. Last 15 minutes. Click Apply.
-
You should see the message - “You don’t have any request log entries”, if there are no calls made during that time duration. Close the panel.
-
In the APIs page, click on the Off/On toggle to disable the v1 API of ACME Fetch Items and Send Notifications API, as shown below.
-
After disabling the API, if you don’t see a need to keep the old version, you may want to delete the API. Click on the ellipsis icon again for that API, to open the Actions menu drop down.
-
Choose Delete API from the drop down. Click Delete in the dialog box that opens to confirm the API delete.


You finished this section - great job! You have successfully created a new version of an API and deprecated the existing API.
Completion
Congratulations! You've finished your second Builder Lab and are now ready to start solving real world automation challenges using APIs. You've earned another chocolate bar!
Please let us know you completed this lab by replying to this topic below with "COMPLETED". We'll validate and then mark the badge on our profile here in Connective. We'd also love to hear any other feedback you might have, so please do tell.
If you are ready to take the next step, we suggest as the next follow-up to tackle lab 202 - Getting started with API management. You will learn the API management product and also extends on many of the concepts you've just learned.