Introduction
This hands-on lab is designed to help you get started with integration flow development using Celigo's flow builder.
By following step-by-step instructions, you’ll learn how to quickly design, configure, and execute a flow that solves real business problems.
You’ll play the role of an integration builder at ACME Chocolatiers, a fast-growing confectionery company seeking to modernize its operations. Your task is to build an integration flow that alerts key decision-makers when inventory levels drop below a defined threshold.
This lab focuses on practical application. The exercise begins with a business scenario and leads into a guided build using Celigo’s low-code interface. You’ll build a flow that:
- Pulls product catalog
- Trims the product dataset using data transformation
- Filters SKUs based on status
- Adds inventory details through a lookup
- Compares inventory levels against a threshold
- Uses branching logic to decide next actions
- Sends appropriate Slack alerts by mapping the data structures
No programming is required and you’ll gain exposure to core flow-building concepts such as exports, transformations, filters, lookups, branching, mapping, and imports.
Whether you aim to streamline operations, enhance visibility, or empower your team with automation, this lab provides the foundational skills to start building right away.
Technology Overview
Modern digital businesses rely on integration software to connect systems, expose data securely, and enable innovation. To ensure integrations are scalable, secure, and manageable, organizations adopt an Integration Lifecycle Management approach. This lifecycle includes six key phases:
-
Connect
Establish secure and reliable connectivity between systems, applications, and data sources. This phase includes setting up connectors and managing authentication. -
Build
Design and construct integration flows that meet specific business needs. This includes defining data movement, applying transformations, handling conditions, and integrating logic such as branching and lookups. -
Run
Execute integration flows with reliability and resilience. This involves triggering flows based on events or schedules and managing flow execution status and performance. -
Deploy
Move flows from development to production environments. Deployment includes versioning, backups and synching changes from one integration to another. -
Monitor
Track the health, usage, and performance of integration flows. Monitoring includes error detection, analytics, and notifications to help teams respond quickly to issues and optimize operations. -
Manage
Maintain, update, and govern integrations across their lifecycle. This includes managing users, granting access, auditing changes and ensuring security compliance and best practices.
As part of the Celigo Platform, the Flow Builder user experience focuses on simplifying the first three phases - Connect, Build, and Run. Specifically for business technologists and IT teams. With its intuitive low-code interface, Flow Builder enables users to:
- Visually define data integration operations and transformation steps
- Connect endpoints to integration flow components using prebuilt or custom connectors
- Securely authenticate connections using a variety of built-in methods
- Trigger and run flows in real-time or on a schedule directly from the platform
TERM
Connections provide a way for Celigo platform to access data in other applications. The connection includes security tokens which are used to align to security requirements.
While Celigo also provides features that support the other phases (such as role-based access, usage logging, and testing tools), this lab centers on helping you get hands-on experience with designing and executing an integration flow using a real business use case.
Hands on Lab Overview
This hands-on exercise is designed for beginner-level builders and focuses on a real-world use case that demonstrates key capabilities of Celigo’s low-code platform.
Prerequisite: Setting up the Lab Environment
Sign-up for a free Celigo account and set up the other apps that will be integrated as part of this lab.
Module 1: Creating Connections
Authenticate connections to the apps used in your flow in the Celigo platform. In this module, you’ll connect Celigo to Slack and Airtable - both of which offer free trials and are ideal for hands-on learning.
Module 2: Your first flow - Product alerts on Slack
Build a foundational integration flow that pulls product catalog data from your source system and sends selected product details to a Slack channel. You’ll learn how to configure, apply transformations, map data, and send messages - laying the groundwork for more advanced automations.
Module 3: Smart Filtering - Trim the Noise from Your Data
Enhance your flow by introducing conditional logic that ensures only relevant product data is passed forward. In this module, you’ll implement filters to exclude inactive or irrelevant records, resulting in a cleaner, more targeted Slack feed.
Module 4: Add Context - Look Up Inventory in Real - Time
Elevate your integration by enriching product data with real-time inventory details. This module teaches you how to join live external data - such as stock levels into your existing flow, giving your Slack messages deeper context and business value.
Module 5: Decision Time - Route Based on Inventory Thresholds
Make your flow intelligent and responsive by introducing dynamic branching. This module shows you how to use conditional logic to evaluate inventory levels and route messages accordingly ensuring the right people get alerted at the right time.
Prerequisite: Setting up the Lab Environment
Create Your Celigo Free Trial Account
If you do not already have an account for Celigo, follow these instructions to procure your free trial.
-
Complete the registration form with your name, company, and email address. Please use a valid business email address for this step.
-
Check your inbox for an activation email and follow the instructions to set up your password.
-
Once activated, you will be logged into https://integrator.io
Creating accounts for the other apps
To help you build, test, and understand integration flows effectively, we’ve selected two powerful but beginner friendly tools: Airtable and Slack. Both platforms offer free trials, making them perfect for experimentation without the need for paid accounts or setup overhead. By using Airtable and Slack, you’ll be working with real-world tools that make it easy to build, visualize, and test integration patterns all without writing code.

Slack is a popular messaging tool used by teams to communicate in real-time. Here, you'll use it as the destination for your flow delivering notifications about products, inventory, and alerts directly into Slack channels using Celigo’s integrations.
Create a new Slack Workspace
This lab uses Slack as a way to send interesting business events to other users within ACME Chocolatiers.
-
Visit https://slack.com/
-
Select Get Started.
-
Sign up with your personal email ID.
-
Enter the OTP sent to your email address.
-
After logging in, select Create a new workspace again if prompted.
-
Name your workspace (e.g., Acme).
-
When prompted to invite colleagues, select Skip this step.

-
Choose Start with limited free version.
-
Close the initial tutorial by selecting the X icon.
-
Select the + icon on the bottom left of Slack and Select Channel.

- Choose Blank channel and select Next and when prompted to name the channel, type in product-notification.

Airtable acts as a simple, cloud-based database that combines the power of a spreadsheet with the flexibility of a relational database. In this lab, you'll use it to store and retrieve product and inventory data through its clean and easy-to-use API.
Create a new Airtable app
-
Sign up for a free account in Airtable (https://airtable.com/). You do not need to enter payment information in order to sign up for the free trial.
-
Do not use the AI prompt, we’ll use some ready to use csv files that you can download from below and upload in Airtable. Navigate to the home screen of Airtable by selecting the Airtable icon on the top left.
-
You will see a button on the bottom left called + Create. Select it.
-
Choose the option Build an app on your own


-
Select on the +Add or import icon
-
Please use the files provided here Google Drive Link
-
The csv file that should be uploaded first is called Products-Grid view.csv
-
Download this file and upload it to Airtable.
-
-
Select Import
-
We now need to create a new table for our inventory so select +Add or import. Repeat the same steps with the other csv file which is Inventory-Grid view.csv.
-
You can choose to rename the table names on the tabs in Airtable by right clicking on the table name. This step is optional. But if you choose to, rename them as Products and Inventory Records.

Module 1: Creating Connections
ESTIMATED TIME : 15 minutes
What You’ll Learn
Before building any flows, you’ll first create connections to Slack and Airtable which are your destination and source apps for the lab. This module walks you through configuring authentication, assigning scopes, and authorizing Celigo to access your accounts.
In this lab, you’ll gain hands-on experience setting up app connections in Celigo. You’ll learn how to:
- Navigate to the Connections section in integrator.io
- Create a new connection to Slack
- Connect to Airtable
This module lays the foundation for all future flows by ensuring the necessary integrations are securely and correctly connected.
Step 1: Set Up Connections to Slack
-
Go to https://www.integrator.io (Celigo's integration platform).
-
In the top right corner, Select the + Create button and choose Connection. A new connection form will appear.

-
A new connection form will appear.
-
Search for Slack by typing it in the search bar. Select it.
-
Name your connection: Slack connection v1
-
For API Type, choose: Web method
-
For Authentication Type, select: OAuth 2.0
-
-
Select Configure scopes
-
From the list, find Channels:Read and check the box next to it.
-
Select the > icon to move it to the right panel.
-
Select Confirm.
-

-
Under User Scopes
- Use the drop down and select chat:write and channels:write

-
Click the Save & Authorize button at the bottom of the form.
-
After selecting Save & Authorize, a popup window will appear. Here's what to do:
-
In the popup, check the top right corner to confirm you're connected to the correct Slack workspace. Make sure it says Acme (or whatever the name of your newly created Slack workspace is).
-
Select Allow to grant permissions and complete the connection.
-

- Click on Confirm.
Step 2: Set Up Connections to Airtable
-
Open Airtable - airtable.com
-
Go to Profile on the top right of Airtable. If you cannot find it, please click on the Home icon on the top left first (Airtable logo).

-
Click on Builder Hub > Developers > Personal access tokens
-
Add a name for your Personal Access Token and add the following scopes.
- data.record:read
- scheme.bases:read
-
Under Access, select +Add all resources

- Create a new token. Copy the token and save it securely.
PRO TIP
Copy and paste your token someplace safe in case you need to use it again. You will have to follow the above steps and create a new token in case you lose it.
-
In Celigo integrator.io, go to Resources > Connections from the left side panel.
-
Click Create connection. Select Airtable.
- Name your connection (e.g., Airtable Connection)
- Select API type as User info.
- Auth type as Token and enter the token you saved from Step 1.
-
You can click on Test Connection to ensure that everything is set up correctly.
-
Click on Save and your Airtable connection is now ready, you can now Close the connection dialogue.
SUCCESS
Great job! You have now created a connection with Slack and Airtable. This will be very useful when creating your flows in the next module.
Module 2: Your first flow – Product alerts in Slack
What You’ll Learn
In this lab, you’ll build your first integration flow using Celigo’s Flow Builder to send product data to Slack. You’ll learn how to:
- Configure a trigger to pull product catalog records from Airtable
- Map fields into a structured Slack message format
- Configure a destination and send a Slack message with product records
This lab introduces core integration concepts making it ideal for beginners building real-time flows that connect systems to your preferred communication platforms.
Scenario
As an admin at ACME Chocolatiers, your team wants to improve visibility into the product catalog by sharing updates directly in Slack.
You’ve been tasked with building a simple integration that automatically sends product information from Airtable to Slack.
The flow will retrieve product records and post them as a Slack message giving internal teams instant access to all product details without logging into other systems.
Step 1: Setup a new Integration and flow
In this section, you'll learn how to create your first integration in Celigo and start building a flow to pull data from Airtable.
-
On the left side panel, click on Home
-
Select the + Create button in the top right. Choose Integrations from the dropdown. A new integration form will appear.
In Celigo, an integration provides a way to organize your work like flows, APIs, settings, and more. You can provide different users access to an integration to allow teams to work collaboratively on these resources.
-
Enter the name: My first integration
-
Click Save and close.
At this point, your integration has now been created! Let’s create a flow.

-
After saving, select the Create flow now or +Create flow. And you'll be taken to the flow builder.
-
Name the flow Airtable to Slack product notifications, you can name the flow on the top left by selecting New flow which is its default name.
Step 2: Setup Airtable as Source
- Click on Add source to begin defining where your data comes from.

-
In the popup window, type "Airtable" into the search bar. Click on the Airtable app.
-
For the Step name, enter: Product data. Click Next.
-
In the Connection dropdown, select the name of the connection you created earlier for Airtable.
-
Under What would you like to export, you’ll see two dropdown menus:
-
Resources: Select Base data - Records
-
API endpoints: Select List records
-
-
Now, enter your Base ID and Table ID, you can find this by navigating back to Airtable > Opening the table > Look at the URL bar.

- You will see the Airtable URL like so: https://airtable.com/[baseID]/[tableID]
Base ID starts with app and Table ID starts with tbl.
-
Ensure you copy the Base ID and Table ID and paste it over in the Celigo platform.
-
On the right-hand side, click the Preview button. If everything is set up correctly, you’ll see a select number of records from your Airtable table.
If nothing shows up, double-check your Base ID, Table ID, and connection settings which should show it is Online.
- Select Save and Close.
Step 3: Setup Slack as a destination
-
Select Add destination / lookup.
-
In the search bar, type Slack and select it.
-
In the Flow Step type dropdown, select Import records into destination application.
-
Name the flow step Product notifications, then click Next.
-
From the Connection dropdown, choose Slack connection v1.
-
Under How would you like the records imported, set the Resource to Chat and the API endpoint to Chat me message.
-
Click Preview to view a sample Slack message. You should see the JSON message with all the values from the first row of your product table.
-
Once everything looks good, select the Save and close button.


Step 4: Configure Mapping
-
On the Flow builder page, Slack should now be listed as the destination.
-
Click on the ellipsis (...) within the Slack box and select Mapping.
-
In the Destination field, find channel and select it - this is a mandatory field.
-
In the Source field, type in "#product-notification" (make sure to include the double quotes). This is the name of the channel you created earlier.
-
Click the + icon to add another row.
-
In the new row:
-
Under Destination, select text.
-
Under Source, choose Product Name from the available fields.
-
-
You can click Preview to see how your data will appear in Slack. You will see the name of the slack channel and one of the products from Airtable.
-
Select the Save and Close button.

Step 5: Run the flow
- By default you are now in Test Mode, you can see this on the top of your flow

-
Click on the toggle to exit Test Mode and let’s go live.
-
Click the Run now button (looks like a play button)

You would have received a Slack message listing your Product titles in the new channel you’ve created.
Module 3: Smart Filtering - Trim the Noise from Your Data
What You’ll Learn
In this lab, you’ll explore how to refine your flows using Celigo’s filtering capabilities. You’ll learn how to:
- Add a filter step to evaluate product attributes
- Configure conditions to exclude inactive or irrelevant products
- Test and observe which records are passed through vs. filtered out
By learning how to control data flow intelligently, you’ll ensure your integrations send only meaningful information to end users or systems.
Scenario
As your Slack channel starts to fill with product updates, the marketing team realizes they only want to see “active” products. As the integration developer at ACME Chocolatiers, your job is to enhance the flow by filtering out any inactive or outdated items—keeping Slack messages clean, relevant, and actionable.
Step 1: Open Output Filters
-
Go to your integration on https://integrator.io/
-
Locate and open the flow you created in the previous module.
-
In the Airtable export step, click the ellipsis (...) in the top-right corner in the Airtable source.
-
From the dropdown, select Output Filter.

Step 2: Configure the Filter
-
Select the + Condition button.
-
In the first dropdown, choose record.field.active
-
In the second dropdown, select equals
-
In the third field, type: 1
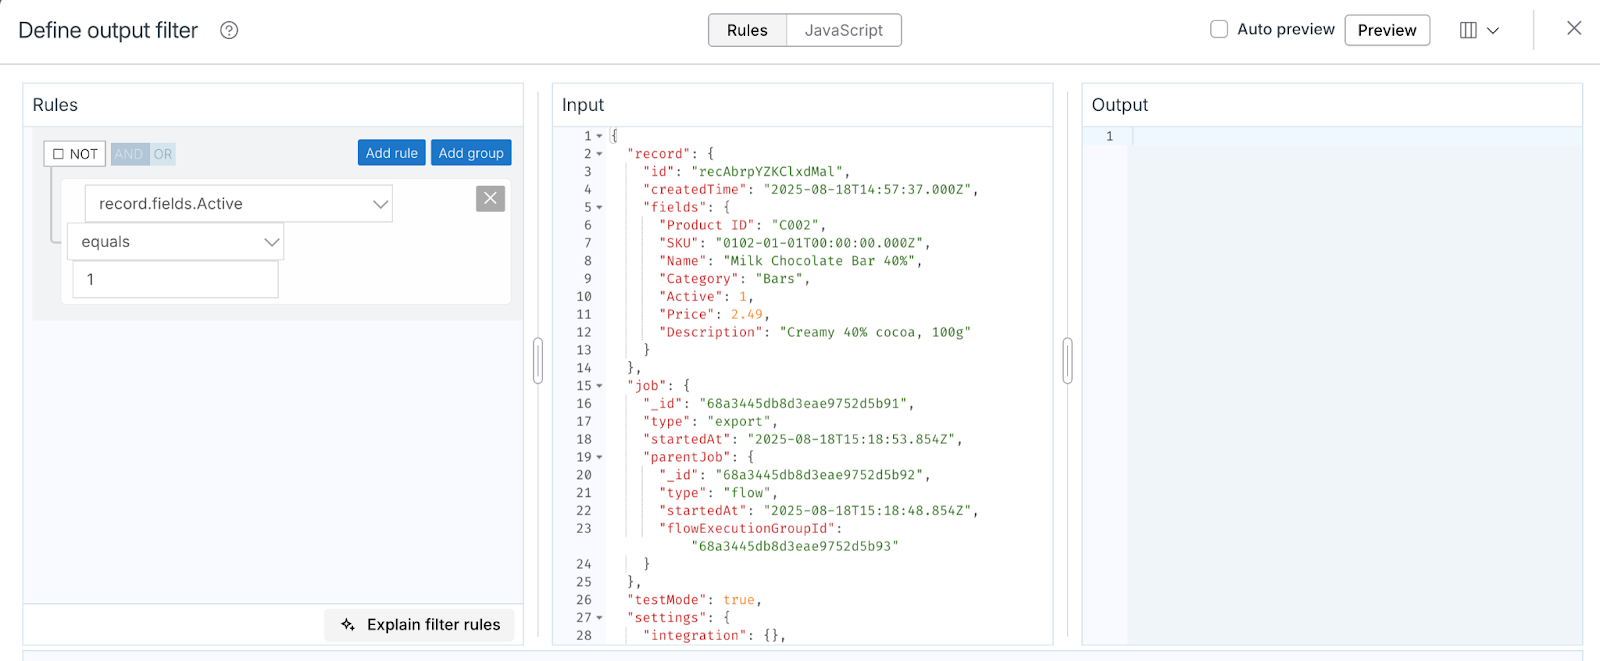
-
Select Save & Close
-
Run the Flow
If set up correctly, your flow will now only process products where active = 1.
Inactive products (e.g., discontinued chocolates) will be filtered out and won’t appear in your Slack messages. Check your Slack channel to see if you now received a message with only 4 products instead of 5. If yes, you have successfully filtered out the inactive product (Mint chocolate drink mix will be filtered out since it's no longer active).
Too Many Steps? Let Celigo AI Handle It In the “Define output filter” screen, try using the Celigo AI with a prompt like “I want active = 0 products to be skipped” and the conditions will be applied automatically.
You will now see the titles of the products that are active and this will be the updated message on Slack.
Module 4: Add Context – Look Up Inventory in Real-Time
What You’ll Learn
In this lab, you’ll learn how to enrich your product data by joining it with live inventory information from an external system. Using Celigo’s lookup functionality, you’ll bring real-time stock context directly into your flow making your Slack messages more actionable and informative. You’ll learn how to:
- Connect to a live inventory database to retrieve current stock levels
- Perform a lookup using the product SKU as the matching key
- Join inventory data into your product records
- Enhance your Slack message with real-time inventory numbers
Scenario
At ACME Chocolatiers, your team wants more visibility into inventory to support better planning and communication. Currently, your Slack alerts only show basic product details, but your operations team needs to know how much stock is actually available before taking action.
Your task is to enhance the existing flow by pulling real-time inventory data from your inventory management system. Using the product SKU as a common identifier, you'll join this live inventory data into each product record giving stakeholders a complete picture with every alert.
Step 1: Insert a Lookup Step
-
In your flow on integrator.io, select the
 icon between your source (Airtable) and destination (Slack).
 -
Select “Add destination / lookup”. We are adding a lookup this time.

-
In the Create destination / lookup modal: Choose Airtable as the connection type.
-
Set the Flow step type to “Look up additional records (per record)”.
-
Name your step, e.g., "Inventory Look Up".
The product table doesn’t include inventory count, so we use a lookup step to fetch the current stock level from the inventory table, matched by SKU. This adds real-time inventory data to each product before sending it to Slack. Lookup allows you to enrich your data from different sources.
-
Select the Next button.
-
In the Connection dropdown, select the Airtable connection you created earlier.
-
For “What would you like to export?”, choose:
-
Resources: Base Data - Records
-
API Endpoint: List Records
-
-
Input Airtable Identifiers
- Base ID: Navigate to your Airtable base and copy and paste the Base ID from the URL. It's the part of the URL starting with app.
- Table ID: Do the same for your table — copy the Table ID from the Airtable URL and paste it into the corresponding field. It's the part of the URL starting with tbl. You have to make sure you have navigated to the inventory table else the Table ID will be incorrect.
The URL is in this format for your reference https://airtable.com/[base ID]/[table ID]/
-
In the Query parameters section, select filterByFormula as the parameter name. In the value field, paste the following formula:
{SKU}='{{record.fields.[SKU]}}' -
Click on Preview, you should see the the SKU, Quantity on Hand and Reorder point amongst other fields.
ThefilterByFormulaparameter lets you write a logical condition that Airtable evaluates for each record. Only records that match the condition are returned. In this case - SKUs.
-
Select the Preview button and you'll see a record of your inventory table.
-
If everything looks good, select the Save and Close button.
Step 2: Result mapping
-
Now that the lookup has been added, locate the lookup step in your flow.
-
Click on the ellipsis (⋮) in the lookup step and select "Result Mapping".
-
In the Lookup Response Field, enter the value:
data(you should see it in the drop down recommended options). -
In the Source Record Field, enter:
fields.updatedInventory


- Click Preview to confirm the mapping works as expected. You should be able to see the all the inventory data from the inventory table show up under the field called updatedInventory.

- Select the Save and Close button.
This step effectively "joins" the quantity from the inventory table into your product record using SKU as the unique identifier. Now this is ready to be used downstream (in Slack) so you can customise your messages as per your liking.
Step 3: Adjust the Slack Mapping
-
In your flow, go to the Slack import step.
-
Click on the mapping icon.
-
Find the text field in the mapping table.
-
Replace the current source value with:
{{fields.[Product Name]}} — *{{fields.updatedInventory.[0].fields.[Quantity on Hand]}} units in stock*
This new expression combines the product name and real-time inventory quantity.
Since you previously mapped the lookup response to fields.updatedInventory, the {{fields.updatedInventory.[0].fields.[Quantity on Hand]}} reference will now correctly show stock levels in the Slack message.
-
Click on Preview and see if the filter works and shows you the product name and real time inventory to ensure everything works as expected.
-
Click Save and Close.

- Click Run and check your slack messages. You should see the Product name followed by the quantity on hand.
You now have a lookup set up that’s going to allow you to use your inventory data. In your slack you should see the name of the product and your quantity on hand from your inventory table.
Module 5: Decision Time – Route Based on Inventory Thresholds
What You’ll Learn
In this lab, you’ll introduce conditional branching logic to make your flow dynamic and responsive to real-time data. Using Celigo’s flow control tools, you’ll customize how your integration behaves based on inventory thresholds. You’ll learn how to:
- Add a branch to compare inventory to a defined threshold.
- If stock is below threshold, send a “low inventory” alert to Slack.
- If above, send alert to a different Slack channel
Scenario
At ACME Chocolatiers, your operations team needs to act quickly when inventory runs low. While they appreciate seeing all product updates, they specifically want urgent Slack alerts when stock drops below a critical level. Products with healthy inventory don’t need as much attention.
As the integration developer, your task is to enhance the flow by adding conditional logic. If the inventory for a product is below a set threshold, the flow should send an alert to the Low stock alert Slack channel.
This way, your alerts become more relevant and your team can prioritize only the items that need attention.
Step 1: Add a Branch Based on Inventory Threshold
- Select the icon after the Inventory Lookup step and select “Add branching”.

-
Name the branch: Product alerts and notifications
-
Ensure the option “First matching branch” is selected.
-
Now we will define Branch Logic
-
Rename Branch 1.0 as Low stock
-
Under Branch 1.0 or now newly renamed to Low stock, select + Condition.
-
In the condition row:
-
-
First dropdown: select
record.fields.updatedInventory.0.fields.[Quantity on Hand]. -
Second dropdown: ensure it's set to Field and Number.
-
Third dropdown choose : Is less than.
-
Before the fourth drop down let's look at the Fifth dropdown: ensure it’s still set to Field and data type as Number.
-
Fourth dropdown: select
record.fields.updatedInventory.0.fields.[Reorder Point].


-
Click Preview to review the logic and you can see which branch each record will flow through. Since we're going to see only one of the records, it might flow though the incorrect branch. We will adjust that later.
-
If it looks good, click Save and Close.
Suppose you have added your condition in 1.0 rather than 1.1, that’s absolutely fine. You can simply drag and drop the Product notification destination to the correct branch. We want to ensure that the Condition logic does not in any way impact our ongoing product notification destination.

Now you’ve set up your branch, the next step is to ensure that the new branch has a destination.
Step 2: Set Up a Slack Channel and Connect It to Your Branch
- Open Slack and select the icon on the bottom-left sidebar to create a new channel. Choose Blank channel and click Next.
- Name the channel: low-stock-alerts
- Skip any additional steps (like inviting users) for now.
-
Go back to the Celigo platform within the Flow builder.
-
We can create a clone of the existing Product notification destination
-
To do this, click on the ellipsis (...) on the existing Product Notification destination and select the Clone option.
-
A clone will be created, you can drag and drop it to the unused branch in which the condition was added in the earlier steps.
-
-
Once the drag and drop has been completed and the clone is in the correct branch - click on the Cloned destination and make the following changes.
- Rename the destination: Low stock notification
-
Select the Save and Close button.


Step 3: Map the Alert Message to Slack
-
In your flow, locate the Slack import step named Low stock notification.
-
Select the Mapping icon.

-
In the mapping screen:
- For the destination record Channels replace this with the value on the right as: "#low-stock-alerts" (Please ensure you use double quotes.)
-
In the next row: For the destination record text enter the Source record field on the right as:
Low stock alert: {{fields.[Product Name]}} has only {{fields.updatedInventory.[0].fields.[Quantity on Hand]}} units in stock. Reorder point: {{fields.updatedInventory.[0].fields.[Reorder Point]}}
What does this expression do?
This is a Handlebars expression that dynamically pulls values from each record in the flow:
fields.[Product Name]inserts the product’s namefields.updatedInventory.[0].fields.[Quantity on Hand]inserts the current inventory level from the updatedInventory part of the JSON which was joined using SKUs in the result mapping steps earlier.fields.updatedInventory.[0].fields.[Reorder Point]inserts the reorder point.
Together, this creates a real-time Slack alert for low-stock products.
- Select the Save and Close button.

- Click Run to test the completed flow. You should see a notification on both slack channels. The channel titled #low-stock-alert will now show you the product that's low in stock and requires a reorder.
Congratulations! Your flow is now fully dynamic! You've successfully implemented conditional logic that routes product alerts based on real-time inventory levels.
If a product’s inventory falls below its reorder point, a message is sent to the #low-stock-alerts Slack channel, giving your teams immediate visibility into items that need attention.
Use AI to generate Flow documentation - Select the description icon next to the flow name and let AI generate a description for your flow. This allows you to better communicate the working of your flow with your co-workers.
Completion
Congratulations! You've finished your first Builder Lab and are now ready to start solving real world automation challenges. You've earned a chocolate bar!
Please let us know you completed this lab by replying to this topic below with "COMPLETED". We'll validate and then mark the badge on our profile here in Connective. We'd also love to hear any other feedback you might have, so please do tell.
If you are ready to take the next step, we suggest as the next follow-up to tackle lab 201 - Getting Started with API Builder. It extends on many of the concepts you've just learned.